Tuesday, September 30, 2014

Microplane Cube Grater

Those folks at Microplane ... they just keep coming up with grate ideas, don't they?
Get it? Grate?

Ah, never mind.

Microplane's claim to fame in the food world, for sure, was graters. At first they were rather utilitarian, but very efficient. Then they started getting more ergonomic and more ... interesting.

One of the latest new toys is the cube grater. It doesn't grate cubes ... it's a cube-shaped grater.

It's a cute little thing. It comes with a plastic container for storage and measuring. The grater has three grating sides, so you can flip the grater with different  grating surfaces on top, and the other grating surfaces are safely covered in the container. Then, when you grate, the goodies fall into the box.

This isn't a huge grater, so you're not going to use it to grate pounds and pounds and pounds of cheese. But it's fine for grating a cup or less at a time if you grate into the container. But - you don't need to use the container. You can just set the grater on your counter and grate as much as you need to.

And if you have leftover cheese, you can store it in that square container, since it's got a lid.

The grating surfaces themselves are exactly what you'd expect from Microplane - sharp and ready to grate.

Who's it for: Everyone needs a grater, and this is a nice small one.

Pros: The container means that none of the sharp surfaces are going to attack you when you reach for it in storage. The fact that it neatly measures as you grate is a bonus.

Cons: If you need to grate a LOT, the container might not be the best idea. But you don't need to use the container when you grate.

Wishes: Silly, perhaps, but I wouldn't mind seeing these in more colors. It's currently available in black, red, and green.

Source: I received this from the manufacturer for the purpose of a review.

Monday, September 29, 2014

Back by popular demand - OXO brings back the *****

This is too fun. I'm not going to tell you what this is just yet. Can you guess what this is used for?


Take another look.


Curvy, pointy ... stabby? Grabby? It's got a handle ... but what then?

My friends at OXO told me that this was a tool they used to sell, but they discontinues it because it wasn't a great seller. They felt that part of the problem was that people didn't know what it was. They saw it in stores, and it didn't make sense.

But ...

People who bought it, loved it. They asked for it to come back. So OXO decided to revive it. This time around, they figured that people would see it online and understand it better.

Have you guessed yet?

Okay, I'll tell you. It's a poultry lifter. And it's simply genius. Picking up a whole hot chicken or duck or turkey isn't easy. I've used my hands, I've used lifters, I've used carving forks assisted by spatulas. And it's never elegant.

This goofy tool simply slips inside the cavity of the bird - whether it's stuffed or not - and then you just lift. I've done sort of the same thing by inserting a carving fork into the bird, but the balance isn't great. This thing makes it simple.

To be honest, I haven't tried lifting a turkey yet. I'll let you know how that goes after Thanksgiving. But I'm confident it will be just as sensible as lifting a whole chicken.

Who's it for: People who want an easier way to lift poultry from a roasting pan.

Pros: It works! It works!

Cons: It really only has one use that I can think of.

Wishes: Can't think of anything I'd change.

Source: I received this from the manufacturer for the purpose of a review.

Friday, September 26, 2014

Apple Pie Kit #Giveaway

Did you see my apple pie recipe over at Cookistry? It's got apples, of course, and a cheesecake-custard filling.

Yup, it's pretty awesome.

And to celebrate the awesomeness of apple pie, my friends at Casabella are offering an apple pie making kit. Although it's not just for apple pie. You'll find uses for these things over and over.

First, an apple corer. ($9.99)
  

Not just the average corer, the special feature on this one is that the corer opens and closes to make it easier to eject the core, which is sometimes the most annoying part of using a corer. It locks closed for storage or for coring.


Second, the butterfly duo scraper ($7.49)


This is kind of cool. There's a rigid scraper inside a softer silicone scraper. You can use it closed so there's a soft edge on a more rigid scraper, or swivel it open (which is when it sort of looks like a butterfly) to use the softer, squishier, bendier scraper on its own, and use the rigid scraper separately as well.

Next, rolling pin spacer bands. ($6.99)


These silicone bands come in pairs of four sizes, so you can roll your pastry to an exact size. I did a full review of them here.

Last, pie crust shields. ($6.49)
  

No need to fiddle with trying to shape aluminum foil onto the edges of your pie crust- just lay these silicone shields on the crust. You can put these on at the beginning of the baking time if you know your crust is apt to brown quickly, or watch the pie and put the shields on when you see they're needed. These are really lightweight, so there's no worry they'd damage the design on a decorative crust edge.

Quick Review:

Who are these for: Folks who bake.

Pros: Handy to have. Everything is dishwasher safe.

Cons: If you're buying these all for the one pie you will bake in your entire life, it makes the pie a little pricey. But ... who bakes just one pie?

Wishes: A wider version of the pie shields might be nice if you've got one of the fancy pie plates with a giant rim.

Source:  I received this from the manufacturer for the purpose of a review and they will also supply the products to the giveaway winner.


THE GIVEAWAY IS OVER

Thursday, September 25, 2014

Wednesday, September 24, 2014

The Ripple - a bowl and plate combo

I am most likely not the right demographic for The Ripple, since I don't have kids and I usually eat at the table.

Okay, I might slurp a peach over the kitchen sink, or I might sneak some chips while I'm watching TV. But for the most part, I don't need to be portable with my food.

But I can see how this would be useful. The bowl and the plate connect, and there's a handle on the bowl - so you can carry both the bowl and the plate with one hand.

The bowl is pretty big, from a soup-serving standpoint, so reasonably-coordinated kids could probably manage to carry soup and a sandwich without making a mess. The bowl is lifted far enough above the bowl that a lot of the plate surface is usable.

The large bowl size would also be nice for large salad to go with the sandwich.

While this probably wouldn't be your first choice for an elegant party, it would be fine for a casual gathering or an outdoor gathering where plastic makes sense.

This product got its start from Kickstarter funding, so it's obviously got a market waiting for it.

Who's it for: People who need one-handed plate-and-bowl carrying.

Pros: Unbreakable and practical. Child-friendly. Microwave and dishwasher safe.

Cons: It has a child-like vibe. While it could be useful for adult gatherings, the look might keep it at the kids' table.

Wishes: I think this would be more useful with a smaller bowl to hold dip, salsa, condiments, toppings ... perhaps interchangeable bowls of different sizes.

Source: I received this from the manufacturer for the purpose of a review.

Tuesday, September 23, 2014

The Smood

Potato mashers have been around nearly forever, and the original design still works. But that hasn't stopped people from trying to improve upon that design.

I have a few new mashers among my collection of kitchen tools, but I still use the oldest one in my collection. It's my mother's big old sturdy masher with a burn mark on the wooden handle.

In my kitchen, I prefer like mashing potatoes by hand rather than using an electric hand mixer. First, an electric mixer can sometime result in gluey mashed potatoes.

Another reason I stay away from the electric mixer is that I have a horrible childhood memory of the time I used an electric mixer to whip potatoes. When the potatoes were served there were flecks of green in them.

It took us a minute or two to realize that I had whipped those potatoes in the pot my mother had cooked them in - and it was a Teflon-coated pot. Yup, those green flecks were Teflon that got scraped off the pot.

The potatoes were ruined, and so was the pot. Oopsie.

When the Smood showed up, I was really curious about the design. It looked cool, it made sense, and the silicone edge for pot-scraping was a nice addition - not just for the safety of coated pots, but just because it does a better job. That's why you grab a silicone spatula instead of a metal spoon when you want to get the last bits of food out of a jar or bowl.

But the whole point is mashing. The conical spring does a pretty good job of trapping potatoes underneath, and when you press down, the space between the spring wires gets smaller and smaller as it mashes and smashes and squishes the potatoes up through the springs.

It's kind of hard to describe exactly how it works, but the video from Dreamfarm shows it pretty well, with some catchy music. And it's an extremely short video.


The test of any kitchen gadget - for me - is whether I keep reaching for it. And yes, this is the one I look for when there's mashing to be done. I haven't used my old masher since this showed up. It works quickly and it makes a smooth mash.

Who's it for: People who are looking for a better alternative to a traditional masher.

Pros: Works well. The silicone edge is great for scraping the sides or bottom of the pot.

Cons:
The masher is pretty big, so you'll have to find a good place to store it. It's also a little pricey compared to cheap mashers.

Wishes: Hmmmm.... I kind of like it the way it is.

Source: I received this from the manufacturer for the purpose of a review.

Monday, September 22, 2014

Meat Claws

Maybe it's just me, but some tools really require sound effects when using them. Seriously. I can't pick up my Meat Claws without a few "rawr" sounds and maybe some hissing and slashing noises as well.

Which makes a lot more sense when I'm shredding meat than when I'm tossing vegetables.

Meat claws aren't exactly cute in the way of some kitchen items, but they're clever and amusing and ... rawr.

Think of them as heat-impervious pointy replacements for your delicate fingers. Or really wide, fat forks.The tips are sharp, so you can impale things, or use the curved surface to hold something - like that roast that you're slicing.

Since your hands aren't covered, you wouldn't want to use them too close to splashy boiling water, but they're big enough to keep you a relatively safe distance from thing that aren't actively splurting or flaming.

These claws obviously aren't an essential item, but they're the sort of thing that you'll use more often if they're within you reach. Like as a strainer when you'd draining water from a pot - as long as you're draining something that's big enough for the claws to catch them. So, draining peas wouldn't be so good. Potatoes would be fine.

The claws are dishwasher safe, but not microwave safe. Why someone would put them in the microwave, I haven't a clue. But I guess you never know. They're made from a hard nylon and are heat-resistant to 450 degrees, so that's pretty safe for most cooking applications. And if you're dealing with something hotter than that, maybe you should be keeping your hands further away, anyway.

Who's it for: People. Mostly people who shred meat, because that's what they were made for.

Pros: Keeps your fingers clean and away from the heat.

Cons: Obviously not an essential tool. If you put them in the junk drawer, you might never think of using them.

Wishes: Different colors would certainly be cool. I'd also like something shaped like this, but with silicone nubbins instead of sharp points - that could be useful for things you don't want to stab, or for use in coated pans that you're worried about scratching.

Source: I received these from the manufacturer for the purpose of a review.

If you want to buy your very own claws (rawr) you can get $2 off your Amazon purchase with the coupon code 89XYUOS6. The coupon is valid through 10/12/14.

Required disclaimer: I received one or more of the products mentioned above for free using Tomoson.com. Regardless, I only recommend products or services I use personally and believe will be good for my readers.

Friday, September 19, 2014

Bacon Jams #Giveaway

I'm kind of excited about giving away some BACON SPREAD from The Bacon Jams. I mean, first, there's bacon. And then more BACON.

I received three jars as a sample, and I kind of fell in love. I used this jam in soup, in bread, on crackers, with eggs, on a spoon. It's really, really, really good stuff. And now I get to SHARE. And because I'm such an awesome negotiator, there will be two winners.

First prize will be a three-pack of Bacon Spread, with one each of the Original, Black Pepper, and Red Chile and Garlic. ($39.99 value)


The second prize will be a Bacon Jams tee shirt in pink or black. ($14.99 value)


Cute, huh? I love it when a company shirt makes sense even if you don't know what the company is.

When you get a jar, spread a little cream cheese on a cracker, top with a little bit of bacon jam, and devour. This is perfect for uses like that, for a sandwich spread, or for use in recipes.

Corn chowder with Bacon Spread!
Speaking of recipes, make sure you check out my corn chowder recipe HERE and my bacon bread recipes HERE.

Note: I received jars of Bacon Spread from The Bacon Jams for my use, along with their sponsorship of the giveaway, but the extra recipes are just because I like this stuff so much. I think you'll like it, too!

Thursday, September 18, 2014

Wednesday, September 17, 2014

Lekue Herbstick

The Herbstick from Lekue is an odd little thing. It's like a silicone Popsicle mold for herbs. The idea is that you fill it with herbs, add olive oil so the herbs are covered, put the cap on, and freeze it. Then, when you want to use those herbs, you either slice off a disk of herbs, or you grate what you need.

It sounds a little odd, but ... I really like it. I mean, I know that I can freeze herbs in ice cube trays, but what if I only need a little bit? Have you ever tried to shave or slice an herb ice cube, so you can use a little bit of it? Not so fun.

The Herbstick lets you hang onto that silicone part while you cut or grate the herbs, so you're not trying to hang onto a slippery, freezing cold, partly melting, oily odd-shaped thing.

Of course, if you always use a whole ice cube worth of herbs, then you're good to go. No need for portioning or grating. But so far I've grated frozen herbs onto pasta and scrambled eggs, and into a sauce I was making. It was nice to be able to do that, then just put the cover on, and toss it back into the freezer.

Since I only have one Herbstick, I filled it up with a mix of herbs from my little wheelbarrow herb garden, but I could see the sense in having a whole array of these, each filled with a different herb. Then, label each one with a piece of freezer tape and a marker.

Maybe one filled with hot peppers. I mean, why not? It would make it really easy to grate just a small amount of those ghost peppers into a dish, right?

I was kind of surprised how much I could squish into the Herbstick. I grabbed a couple hand fulls of oregano, basil, chives, and parsley, chopped them, mixed them, put them into the Herbstick, pushed them down a little, and then realized I had barely filled it halfway.

Leaves are fluffy. I didn't need them to be fluffy. I could pack them in much more tightly, and that's what I did. So although this is pretty small, it holds a decent amount of herbs.

Who's it for: People who want to freeze fresh herbs in small quantities.

Pros: If you live where winter happens, this could be very handy. The covered container is nice, and it's easy to push the herbs up for slicing or grating.

Cons: If you live where herbs grow outdoors all year long, you probably don't need this. Also, it's a tad pricey for one container. But ... around here fresh herbs are pricey in winter, so if it saves me from buying them - or from throwing out excess - it would pay for itself pretty quickly.

Wishes: I would love it if these came in a variety of colors for easy color-coding. I could see keeping savory herbs in green, hot peppers in red ... or whatever makes sense.

Source: I received this from the manufacturer for review.

Tuesday, September 16, 2014

Clongs from Dreamfarm - Yes, it's food-related

I hope I never get invited to the Dreamfarm offices.

Yes, really.

It would shatter the illusions I have of them working in an office building surrounding an always-springtime meadow filled with frolicking unicorns.

Seriously, these people are way too whimsical to be working in a cubical farm.

On the other hand, their products make so much sense. I'm totally in love with the clongs I just got.

Clongs? Um, shoes that have bells on them?

No, clongs are tongs. Click-lock tongs. Get it? Clongs?

Okay, I have maybe a half-dozen different tongs - long ones for barbecue or for reaching down into a tall pot; normal tongs; cheap tongs, silcone-tipped tongs; salad tongs; mutant tongs ...

What sets these apart is two things. First, there's the odd protrusion along one side. The idea is that you can set the tongs down on the counter and you're not slathering food on the counter since the business end stays elevated. Yes, there can still be drips, but you won't end up with a big smear of tomato sauce on the counter.

But the thing I really like best - and maybe I'm goofy - but what I like best is how the tongs lock and unlock so they're open or closed. Every other set of tongs I have, you push the tab or button on the hinged end of the tongs to open them - which is great because you can just tap them on the counter. And then you pull the tab out to lock the tongs in the closed position. Which works fine.

BUT ...

These tongs use a mechanism that's like a clicking ballpoint pen. Tap to open, and tap to lock.

See how that makes sense? You don't need two hands to lock them closed, which is great when you're holding the tongs in one hand and you've got the lid of the pot in the other hand. Tap, tap. Tap, tap. Genius. It's a little thing, but I just love it. Except, of course, that at first I was trying to pull the tab to lock the tongs closed. But now that I know how they work, I'm tickled.

Clongs come in 9-inch and 12-inch lengths with silicone tips so you can safely use them in your nonstick pans. There's also a set of 15-inch barbecue tongs with some extra features.

Who's it for: Pretty much everyone needs tongs. If you're replacing yours, or you need extras, consider these.

Pros: Extra features compared to standard straight tongs.

Cons: Extra features cost more money.

Source: I received these from the manufacturer.

Monday, September 15, 2014

Vacu Vin Instant Pickler

Quick pickles are all the rage on cooking shows, but quick is a matter of opinion.

If you make quick pickles and let the marinate for the time it takes a Chopped contestant to get the appetizers served, what you end up with is vegetables in a vinegar dressing. It's more like salad than pickles.

There are tricks for getting the pickling liquid into the vegetables a little faster. Like using heated liquid and then chilling the vegetables. But then you risk serving vegetables in a warm vinegar dressing. And that's not optimal.

The Vacu Vin Instant Pickler gives you another option. You use the included hand pump to remove air from the container and create a vacuum.

That also removes air from the vegetables and makes them more willing to absorb the pickling liquid.

Look HERE for this pickle recipe.
It's not snap-of-the-fingers fast, but it's a heck of a lot faster than letting the vegetables drink in the liquid at their own pace.

First, I used the Instant Pickler to make some simple cucumber slices. This is something I make often enough to know what to expect. With the Instant Pickler, a few hours gave me the same result that I'd normally get after a day in the refrigerator.

After a full day in the Instant Pickler, the pickles were about as pickled as they could be - like several days the traditional way.

I used the Instant Pickler to make a pickled carrot mixture that would normally marinate for a minimum of two days - or up to two weeks - and I was pretty happy with them after just a day in the fridge.

Who's it for: People who pickle, and want it quicker.

Pros: This makes pickling quicker.

Cons: Pricier than a jar.

Wishes: Right now there's just one size - I'd like to see several other sizes offered, perhaps without the hand pump, since you only need one.

Source: I received this from the manufacturer for the purpose of a review.

Friday, September 12, 2014

Cake Boss Airbrush #Giveaway

My husband sort of laughs at me when I say I'm not very artistic. I think it's true. Or mostly true. You see, I can't really draw realistic things very well.

But I'm fine with abstract swirls and colors and swooshes.

So when I received an airbrush kit from Cake Boss, I was excited, enthusiastic, and just a little bit scared.

Would I make a mess of things, or would it be acceptable? I wasn't really expecting anything stunning or professional or pretty, or anything beyond "that's not too bad."

What I ended up with, on the first try, way wayyyyy beyond my expectations. And it was a heck of a lot of fun. And it was a lot faster than I expected. I whipped through a dozen cupcakes and looked around for something else I could airbrush.

Luckily, the dog was moving too fast, or she might have had a pretty gold gloss on her.

Before I used the airbrush, I did a little research online about what kind of food coloring to use. There are some that are formulated for airbrushes, but some people said that regular food coloring was okay, too. I decided that since this was a brand-new airbrush and I wanted the best results, I'd buy airbrush coloring. It was easy enough to find, I picked up a few basic colors and some pearl and gold as well.

I frosted some cupcakes with buttercream, let the buttercream dry long enough until it had a nice crust, then had some fun with colors. And I was more than pleased with the results.

These were no doubt the prettiest cupcakes I've ever made, and every one was a little bit different, which made them much more interesting, right? And. as a side note, this was an amazingly good chocolate cupcake recipe, too!

The cupcake recipe is HERE.

And keep in mind, this was my very first try, with no training and no instruction. I just twirled and sprayed and twirled and sprayed.

If I can do this, anyone can. YOU can.


The buttercream recipe is HERE.

Who's it for: Anyone who wants to have fun decorating cakes, cupcakes, cookies ...

Pros: Easy to use. Fun! Fun! Wheeee!

Cons: If you don't do a lot of decorating, an airbrush is an investment.

Source: I received an airbrush for myself from the manufacturer, and they are supplying one for the giveaway as well.

 GIVEAWAY IS OVER.

To make it a little bit easier for someone to decorate baked goods, I've got a Cake Boss airbrush kit to give away. Doesn't this look like fun? And it's really simple to use!


If the widget doesn't load right away, give it a couple seconds. This is worth it. I know someone will have a ton of fun!


Thursday, September 11, 2014

Wednesday, September 10, 2014

How to make BITTEN cookies

Wanna piece of my heart?
For the longest time, I thought that it would be super-cool if someone would make cookie cutters in the shape of teeth.Not, like a single tooth. I guess I'm thinking more of a mouth. Or really, a bite.

Because I thought it would be funny if I could make cookies and then cut out bite-shaped marks, so it would look like someone nibbled at them.

Of course this would only work with rollout cookies, because those are the ones that would hold their shape. Peanut butter cookies or chocolate cookies might spread too much, and lose the bite effect.

Except ... hmmmm ... in theory, bites could be cut out of baked-but-not-yet-hardened cookies. I haven't tried that yet, but it's certainly on the agenda.

I thought it would be particularly funny with things like gingerbread men, but for other cookies, too.

I really, really really wanted someone to make that cutter for me.

And then I found it.

No, not online. Not in a store. In my baking supplies.

Yes, I already had the perfect cutter for taking bites out of cookies. No, not my teeth.

Biscuit cutters.

Specifically, fluted (or wavy) biscuit cutters
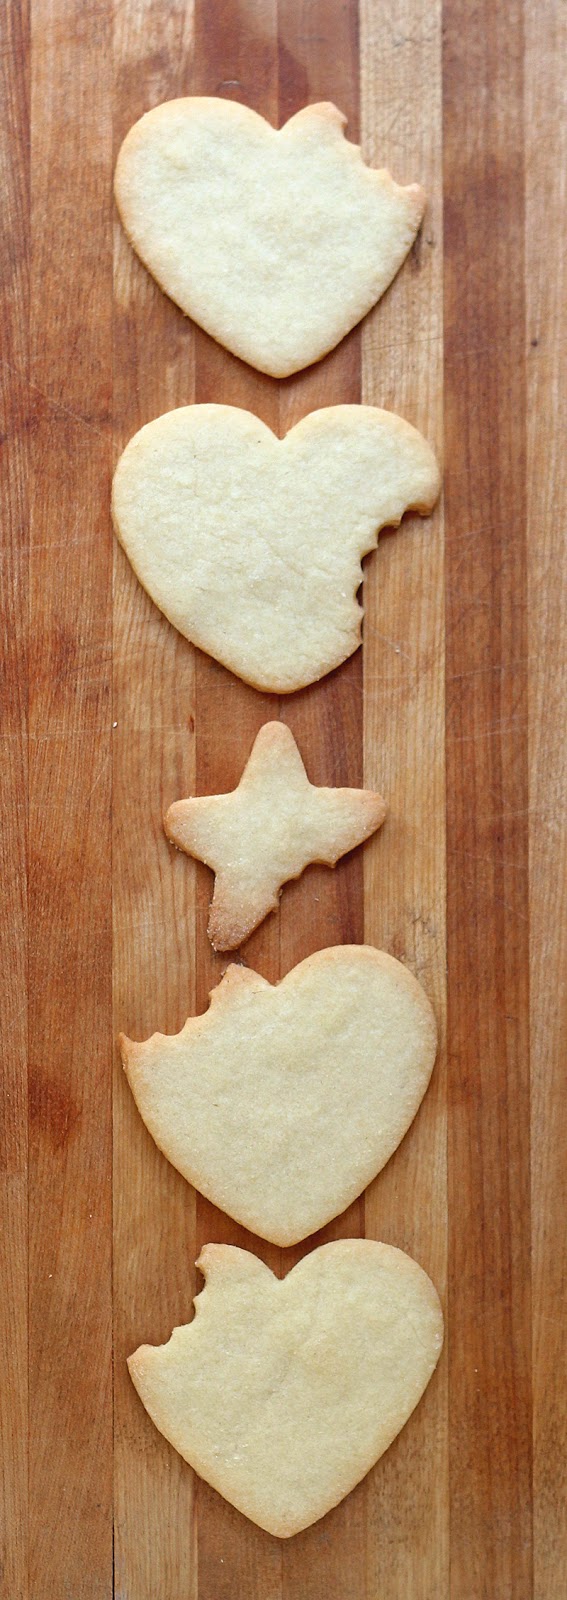
. They're absolutely perfect for making bite-shaped cutouts on cookies.

Is this something you're going to do every time you bake cookies? Not necessarily. Or maybe.

Chomp. Chomp-chomp.
It's not something you have to commit to. You can take a bite out of just one or two cookies from each batch.

As far as the how-to, use a smaller biscuit cutter than you think you need - you're going to want to show enough of the curve, and at least four of the scallops that represent the teeth - and if you can manage to show parts of two more "teeth," that's great.

For the fun of it, I used a small knife to add some pointy teeth to represent vampire teeth.

After I thought about it, I realized that a fanged-tooth bite wouldn't look quite like this. But I thought it was fun, anyway.

Vampire bite!!!
And ... that's it! Bitten cookies!

For the cookie recipe, see THIS post.

Tuesday, September 9, 2014

9 Ways to Use a Cast Iron Frying Pan (besides frying!)

Pizza baked on an upside-down cast iron frying pan.
Cast iron frying pans are versatile, durable, and - let's face it - cheap. While pans that have passed down for generations might have a whole lot of sentimental value, you can buy a brand new cast iron frying pan for not a whole lot of cash.

Besides frying your bacon, a cast iron frying pan can be used for baking or as a casserole dish for your potatoes au gratin. I've also used a cast iron pan for biscuits, cakes, sticky buns, upside-down cakes, and giant cookies.

If bake a sugary-sticky cake in a cast iron pan and you accidentally let it cool too much and the sugar hardens, you can put the pan on the stove and heat it just enough to soften the sugar and release the cake - you probably wouldn't want to do that with a standard cake pan.

When you're baking in a cast iron pan, you might need to adjust your cooking time or temperature to get the same results you'd get from a traditional baking pan, but cast iron also offers baking options you couldn't get from your standard cake pan - like preheating the pan in the oven before adding your batter, or cooking your caramel in the pan on the stove top before adding the dough on top of that gooey caramel.

Are those uses too obvious? How about these?

Personal Pizza Baking Stone


Preheat your cast iron frying pan upside-down in the oven and use the bottom surface to bake your personal-sized pizzas. Needless to say, a larger pan will give you more surface area to bake on, but even a normal-sized cast iron pan is large enough for personal pizzas.

Meat Mallet

When you need to flatten some chicken breasts or pound a round steak flat, a cast iron frying pan has the heft to do the job, and a nice flat bottom surface for even pounding.

While it seems logical that a larger pan would give you more weight for pounding, a smaller pan is easier to lift, and lets you flatten the meat with a little more precision rather that splatting it flat with one massive smack.

Steam Pan

Many bread recipes call for a steam pan in the oven. It's a simple thing, really. Just a pan to hold water to create the required steam.

A cast iron frying pan works well, with a caution. While cast iron pans are extremely sturdy, they can crack due to thermal shock - I had it happen once on the stove when I added oil to a hot pan, and it scared the heck out of me.

If you put the pan in the oven with water in it, you're fine. If you preheat the pan in the oven, and then add boiling water, you're probably okay, But if you preheat the pan, then throw ice cubes into it, there's a risk that it's going to crack. It might be fine, but you might want to use a cheap new pan rather than great-grandma's heirloom pan for that sort of abuse.

A well-seasoned pan will suffer no ill effects from occasionally using it for boiling water, but if your pan has a thin coating of seasoning, check it to make sure it's not losing so much seasoning that it's at risk of rusting.

Mortar and Pestle 


Who needs a mortar and pestle when you've got a cast iron frying pan - or even better, a pair of pans that nest together? Put the nuts or seeds in the bottom pan, place the smaller pan on top of the product you're smashing, and push and twist to break up those pesky nuts and seeds. By using two pans rather than just crushing seeds on your cutting board, you contain the seeds so they don't fly all over the kitchen. And, if you need toasted seeds, you can toast first, then crush.

For things like graham crackers, cookies, or corn flakes, you can place them in a plastic bag and use a single pan to crush them to crumbs.

Brick

Chicken under a brick sounds like a fun recipe - use a handy brick to weight down and flatten a half-chicken on the grill or in a pan. But ... who has a brick sitting around? If there's a construction site nearby, maybe you can borrow a brick. But even if you wrap it in foil, are you sure it hasn't been in contact with things you don't want near your food?

A cast iron frying pan can perform the same function, it offers a larger surface area than you'd get from a brick, and it's food safe.

Sandwich Press

Sure, an electric panini press is a fun gadget, but if you don't need it often, a pair of cast iron frying pans work really well. Heat both pans, place your sandwiches in the larger one, then put the smaller pan on top, using the bottom of the pan to press and toast the sandwiches. You won't get grill lines, but you'll get a nice toasty surface.

Weights

Sometimes tofu needs to be pressed, and a cast iron pan makes a fine weight. You can put the pan right on top of the wrapped tofu, or place a baking pan on top of the tofu and use the cast iron pan to add weight.

If you've ever made home-made cheese, the same method works just as well. If you need a precise weight for the type of cheese you're making, you can use several cast iron pans (weigh them first, then add up the weights to get to the ideal amount) or use the pan to hold canned goods, pie weights, or whatever else you need to get to the proper weight.

Tortilla Press

While you won't get the leverage that a tortilla press provides, the bottom of a cast iron pan gives you a flat surface and a bit of weight to flatten corn masa into a flat tortilla. If you regularly make tortillas, you might want to invest in a tortilla press. But for a few tortillas, a cast iron pan will do the trick.

Heat Diffuser

Pots and pans have heavy bottoms for a good reason - to spread the heat out evenly to avoid hot spots. But what if your ideal cooking vessel doesn't have a heavy bottom? What if you need super-gentle, super-even heat? Just use your cast iron pan as a heat diffuser. Put the cast iron pan on the stove, and put your cooking vessel in the pan.

How do you use your cast iron frying pans, besides frying?

Monday, September 8, 2014

BakeItFun Silicone Baking Mat #BakingMat

These days, silicone baking mats are almost must-have in the kitchen.

Well, if you never cook or bake, you probably don't need one. But if you do bake cookies, make candies, or bake any sort of sticky, jammy, free-form breads, you might want a silicone baking mat.

You can also use it for cooking meat in the oven, instead of lining you pan with aluminum foil. Like when you're making fish sticks.

Ha. Fish stick might not be the best example, but if you're cooking something that's likely to stick or burn to an uncovered pan, a silicone mat will make cleanup a lot easier.

I still use parchment paper and aluminum foil for some things, and I lived without silicone mats for a long time. But now that I have them, I'm glad they exist.

The one use where I think silicon mats are nearly essential is for candy-making, because nothing sticks, and the silicone can take the heat from super-hot sugar.

If you're not using a silicone mat for making things like peanut brittle, you'd usually butter the baking sheet, and then you end up with peanut brittle with a greasy bottom. With the silicone mat, you don't need butter. The cooled candy lifts right off of the mat so you can break it into pieces.

I tested a baking mat from a company called BakeItFun and it performed as expected. No sticking, it cleaned up easily, and it fit into my baking pan like it was supposed to. What more can you ask for?

Well, there are two extra features on this mat that you might not find on other brands, First, there are the circles on the mat to indicate even spacing for 12 cookies (or other items). The second really neat thing is the measurements along the edges of the mat. I mean, seriously, how many times has a recipe told you to make 2" balls of cookie dough? Do you really pull out a tape measure or ruler? If you've got the mat out for baking, you can check the cookie size right there.

Those features probably aren't critical enough to make me throw out all my existing mats and replace them with these (and I'm pretty good about eyeballing even cookie placement, anyway), but if you're shopping around, you might was well compare features and prices.

This mat is available on Amazon, currently selling for $16.77, which is quite reasonable. I remember when silicone mats came out and they were almost an investment purchase. I loved them then, and now that they're more reasonably priced, I love them more.

While baking mats don't last forever, they do last a long, long time, as long as you remember not to cut on them or fold them violently - roll them for storage, or store them flat. I have mine hanging inside one of my kitchen cabinets, with a sturdy clip grabbing onto them.

Who's it for: People who bake or who make candy.

Pros: Easy cleanup, reusable. Measurements along the edges and marking for even placement of 12 items.

Cons: You have to remember not to cut on it, as that will damage it

Source: Received from manufacturer for myself and for the giveaway.

I received one or more of the products mentioned above for free using Tomoson.com. Regardless, I only recommend products or services I use personally and believe will be good for my readers.

Friday, September 5, 2014

10" Williams Sonoma Thermoclad Skillet #Giveaway

Ya wanna hear a funny story?

It's about this frying pan. Yes, humor happens in strange places in my house.

I got a pair of identical stainless steel frying pans a while back from Williams Sonoma when I was working on a promotion for them. I kept one and set the other one aside. I figured that I'd do a giveaway eventually.

I wasn't really doing a lot of giveaways on my recipe blog, so the pan got shuffled from one place to another. But when I started this blog, I thought, gee, I might as well put the nice frying pan up for grabs.

And when I looked for it, it was ... gone. Poof! Vanished.

I looked every sane place I could think of, and a couple of insane places. I knew what the box looked like. I knew how the box opened. It wasn't in the house and it wasn't in the garage. Where could it be?

Then I started thinking about the way we recycle boxes, which is usually my husband's job. And I thought, gee, I wonder if that box went out with the recycling? It was the only think I could think of, since it wasn't anywhere else. Not in the house, not in the garage. Not under the car. Not anywhere else at all.

Or, anywhere else visible ...

I asked him if he remembered seeing the box anywhere, and I told him my "out with the recycling" theory. He didn't think it was possible, but he didn't remember seeing it anywhere, either. It was just mysteriously gone.

Recently, I went looking though my "giveaway" boxes looking to see what sorts of gadgets I might combine into a few coherent giveaways. I had a box that had fall-related items, like a big roasting pan and some turkey tools. And then I noticed a box underneath.

"Mumble ... mumble ... dammit!" I might have said a few other things as well.

I hear a voice ... "You found that pan, didn't you? I knew this day would come." My husband was chuckling.

He was pretty sure he hadn't thrown the pan out, because he looks in the boxes-to-be-recycled, just to make sure I haven't left something behind that I might need. And he breaks down the boxes, so they're more compact. The chance of a frying pan getting recycled with the cardboard was pretty slim.

But still, when it was gone ... I thought ... where could it be???

Obviously, it could be at the bottom of another box, right under the roasting pan that I'll be giving away this fall. Right where I put it, apparently.

*sigh* This happens whenever I sort and re-arrange and organize. I could visualize that pan where it sat before it went into that box. But after ... nah, it couldn't have been me who moved it. Gremlins, I say. Gremlins.

So, lucky you. I have one really nice 10-inch stainless steel Thermoclad skillet ($130 value) to give away. This pretty pan currently sells for $130, and it's definitely well-made. I think you'll like it.

And don't forget to check my roundup of giveaways from some of my favorite food bloggers, HERE.

This giveaway is NOT sponsored by Williams Sonoma. They gave me the pan during a promotion; I was not required to write about it, mention it, or promote it in any way. This is just from me to you.

Thursday, September 4, 2014

Wednesday, September 3, 2014

Jokari Baggy Rack

An online friend of mine posted about this baggy-rack thing she bought and how great it was, and my first thought was that it was sort of silly.

Later that night I was trying to shovel cookie dough into a zip-top bag and thinking (once again) that it would be nice to grow an extra arm. And then I thought, gee, maybe that baggy-rack thing isn't so goofy after all.

I contacted the company to see if they wanted a review, because, well, why not? It's what I do. I can't afford to buy every last thing I review, or you'd be reading about the best toothpicks for cheese cubes.

I didn't get an answer from the company, so I bought the darned thing. I mean, I can't afford to buy everything I review, but I can buy some stuff.

And I was intrigued by the Jokari baggy rack, particularly after my friend was so enthusiastic about it. It sounded like something I might actually use regularly.

If it worked.

It wasn't long before I tried it. Like, as soon as I opened the box from Amazon. And then I found more uses. It's great for holding bags that I want to put food into - like cookie dough, leftovers for storage, flour for breading meats ... all sorts of things. I'm thinking it might also be useful for holding pastry bags for filling them, because that's always messy when I do it. Always...

And, it could also be useful for holding trash bags for disposal or for compost.

Who's it for: Pretty much anyone who doesn't have three arms.

Pros: This is useful and inexpensive.

Cons: It's one more thing you have to store.

Source: I purchased this from Amazon.

Tuesday, September 2, 2014

Propresser Garlic Press Review #garlicpress

If you hate garlic presses on general principles, then just look away for a while.

I don't always use a garlic press, but sometimes it's exactly what I'm looking for. Sometimes I want mashed and pressed and squeezed garlic, sometimes I want whole cloves, and sometimes I want neat slices or a precise mince. They're not the same thing, any more than a whole boiled potato is the same thing as a mashed potato.

And, let's face it, sometimes a press is just convenient. Put the garlic in the basket, mash, and you're done.

Yes, I have knife skills and I know several techniques for chopping and mincing and smashing garlic. But, to be perfectly honest, knife-chopping one clove is ... silly ... particularly if I'm working on several different dishes at the same time. I can rinse cucumber residue off a cutting board and continue with something else, but if I've mashed a garlic clove, that board's going to need a good wash before I start prepping something that shouldn't be garlicky.

On the other hand, pressing a clove or two doesn't require a cutting board and it takes just a second to mash the clove right into the cooking pot. The bonus is that you don't necessarily need to peel the clove before you press. Then just toss the gadget in the sink, and when you're ready to clean it, rinse out the fibery stuff caught in the basket, and finish with a hand-wash, or toss it into the dishwasher.

Did you know that there are other uses for a garlic press besides just pressing garlic? I'm working on an article about it, but one thing you might not have thought of ... juicing key limes. It works. I've done it. You want to make sure your press is really clean because a garlic key lime pie might not be so good. But it works the same way as those bigger juicers for lemons, limes, and oranges.

So, if you're committed to owning a garlic press, you might as well get one that works well and that you'll like using. The Propresser from Orblue is super-sturdy, which is a good thing. I can't imagine what could break on this, or how you could possibly bend or mangle it in normal use. I even pressed ginger through it, and it worked. There was a lot of residue left in the press because ginger has a lot of fibers, but that's not necessarily a bad thing. I got the good pulp, got the juice, and left the dry stuff in the basket.

Speaking of which ... the basket flips away from the handle to make it easier to get at it from all angles to clean it. To be perfectly honest, I've never had problems cleaning a garlic press, though. A quick rinse to get rid of the residue, and then it goes into the dishwasher. If there's stuff that's stuck in the holes, I have a toothbrush that I use for that sort of thing.

Since this is made entirely from stainless steel, you shouldn't end up with it absorbing any odors, if that's a consideration.

There's more info about the product on Amazon if you want to read about guarantees and other details.

If you want to see a recipe where I pressed both garlic and ginger, check out this one on Cookistry.

Who's it for: Garlic lovers who also love gadgets.

Pros: This thing is super-sturdy. If you've got the muscles, you could press pretty much anything.

Cons: For as sturdy as this is, I wish the basket was a little larger. It's roomy, but I always want more.

Source: I received this from the manufacturer.

I received one or more of the products mentioned above for free using Tomoson.com. Regardless, I only recommend products or services I use personally and believe will be good for my readers.