Tuesday, December 23, 2014

Last-Minute "Wrapping"

So, imagine that you're about to head out the door to an open house, housewarming, holiday cocktail party, or ... whatever.

You've picked up a bottle of Johnnie Walker Black for your hosts. The only gift bags left are the ones that look like they're for a toddler. You have scraps of wrapping paper. You're not about to go buy more wrapping paper now. No way.

But you don't want to hand your hosts a nice bottle in a brown paper bag.

So you get crafty.

This requires one box of any size the bottle will fit into with the neck sticking out (it forms the chimney). Just cut the two smaller flaps to form the triangular front and back pointy parts of the house (the peaks? is that what they're called?)

Then put the bottle in the box along with some packing material to hold it in place. Or more gifts. Cookies are nice. Then fold the other two box flaps and tape or glue them to the triangular front and back.

You'll have a hole in middle of that top portion, unless your box had weird long flaps. Use an extra piece of cardboard or even some aluminum foil to form that last piece you need. This is just "wrapping" so it doesn't need to withstand hurricane-force winds.

Find some white tissue paper or some baking parchment to form a snowy roof. I crumpled mine and then cut the edges into spikes to form icicles. Wavy cuts would be fine. It's not fine art.

Attach the paper the to roof, and you're good to go.

Or, if you like, you can decorate the house. Write things on it. Draw a door and some windows. Add some lights on a string, a wreath, or a Christmas tree.

Or draw stick figures of the family you're visiting.

Or write random holiday greetings in multiple languages all over the box.

Or have everyone in your household write their own message. Or ... whatever is fun and easy for you.

Then go to your party.

Seriously, if you're artistic and you've got loads of time, you could paint the box in all sorts of fancy ways. But if you're on the way out the door, this is clever and different and easy and if you don't want to decorate, just tape the box together, put that roof on, and run out the door.

Have a great holiday!

The nice folks at Johnnie Walker recently sent me a bottle. So I stuck it in a box. I'm crafty like that.

Friday, December 19, 2014

Krusteaz Cookie Giveaway

Photo courtesy of Krusteaz
I bake from scratch most of the time, but even I have days when I want a quick fix and I don't want to look up a recipe (or make one up!) and I just want something fast, that I know will work. A good baking mix is great to have on hand for those sorts of personal emergencies.

The other time when I often use mixes is when I'm testing a new piece of bakeware. I want to know that any issues - sticking burning, uneven baking - is not the fault of some recipe that I randomly chose.

Lately, my mix of choice has been Krusteaz. I bought them in the past, then they sent some to me. I bought more (ooh! look! I haven't tried THAT yet!) and then the sent other stuff. I won't say I've tried every single one of their products, but I've tried enough of them to know that they're trustworthy. Even up here at high altitude, I get good results.

Now that it's cookie season (from the second it's not too hot to bake, until the time when it is too hot to bake - a season that lasts about 359 days) we're going to chat a bit about cookies.

They have a whole bunch of different flavors of mixes (of course) but they've come up with a bunch of different variations on using the mixes to make something a little bit different.

For example, you can use the Peanut Butter Cookie mix to make Peanut Butter Chocolate Cookies and you can use the Sugar Cookie mix to make Chocolate Marble Cookies (click on the links to see the recipes.

I thought that using the Snickerdoodle mix to make Cinnamon Roll Cookies was particularly appealing. I guess I have a thing for swirled baked goods. In any case, the recipe is below.

Also below (hehe) is a giveaway of all three of the cookie flavors I mentioned - Peanut Butter, Snickerdoodle, and Sugar Cookie - so you can have your own emergency supply of cookies at your disposal.


Cinnamon Roll Cookies
Recipe & photo courtesy of Krustez; used with permission
Makes 36-40 cookies

For the cookies:
1 pouch Krusteaz Snickerdoodle Cookie Mix
1/2 cup (1 stick) butter, softened
1 egg
2 tablespoons Cinnamon-Sugar Topping (included with the mix)
1/2 cup chopped pecans

For the drizzle:
3/4 cup powdered sugar
2 tablespoons milk

Blend the cookie mix, butter and egg until a dough forms. Transfer the dough to a floured work surface and roll it to form a 12x8-inch rectangle.

Sprinkle the cinnamon-sugar mix and pecans over the dough. Starting with  the 12-inch side, roll the dough into tight log. Cover and refrigerate until firm.

Heat the oven to 375 degrees and have a cookie sheet standing by. They suggest a greased cookie sheet, but these days I use parchment or a silicone mat.

Cut the log into 1/4-inch slices and place them once 1 inch apart on your prepared cookie sheet. Bake at 375 degrees for 7-9 minutes.

Let the cookies cool completely on a wire rack.

Meanwhile, make the drizzle:
Stir the sugar and milk together until smooth. Drizzle over cooled cookies.

Thursday, December 18, 2014

Wednesday, December 17, 2014

You need a good bread knife. You really do. I might have one for you.

You can enter to win one HERE.
I've owned a few different bread knives over the years. Most of them have been good enough. I mean, you don't need a chain saw to slice through bread.

But when I got the CLASSIC 9-inch Double Serrated Bread Knife from WÜSTHOF over a year ago, I learned a few things.

I knew this knife would be nice, but I didn't expect to feel such a difference between this and my other bread knives. I tried a slice-by-slice comparison with this knife and the best of the rest, and where other knives skittered over a crisp crust, this one bit in and sliced nicely - it even made neat slices of bread that was slightly warmer than it should have been.

The thing about slicing bread is that you've got several textures going on. You've got a crisp or chewy crust with a soft, squishy interior. The knife needs to be able to handle the crust without needing excess pressure that would mash the softness.

I've had this knife for a little over a year, and every time I reach for it, I'm thrilled that I have it. It makes picture-perfect bread slices every time.

If you bake a lot of home made bread, you NEED this knife. And, lucky for someone, I have a link below where you might actually WIN one.

Who's it for: People who bake a lot of bread, or who buy a lot of whole artisan loaves.

Pros: This is a quality knife that will last a lifetime.

Cons: Like any good knife, it's pricey. Whether it's worth it depends on how often you bake your own bread, or how often you buy unbaked artisan breads. 

Wishes: Hmmm. Can't think of anything, really. 

Source: I received this as a gift when I signed the contract for my bread-baking book.

Tuesday, December 16, 2014

Re-review: Magimix Food Processor

Quite some time ago, I reviewed the Magimix 14-cup food processor in brushed chrome. Now that I've had a chance to live with it for a while - I've had it for well over a year - I figured it was time to update my thoughts.

And... I have a link for a giveaway of a Magimix Food Processor. Check the bottom of the post! Giveaway is over.

I've been using it a lot for the "usual" processor tasks, like making pastry dough and chopping/pureeing various foods. It performs those tasks really well, and it has three different-sized bowls, which is a great option.

But there are a few other things that make this unit really stand out from the crowd.

The first is a plastic ring that comes with the food processor that makes is perform more like a blender. While blenders and food processors have similar spinning blades, they don't work exactly the same.

The plastic insert causes the liquid to get thrown around a bit, just like what happens inside a blender. I blitzed some ice and made some smoothies and shakes, and the result was just like I'd get from my blender.

While I haven't thrown out my blender yet, it is nice to have other options, and if you don't want both appliances, you won't need a blender if you have this processor.

Carrot-orange juice made with the juicer attachment.
So, that's pretty cool, but the thing I fell in love with was an optional accessory - a juicer attachment. It fits into the bowl of the food processor and works like a centrifugal juicer, shredding the fruits and vegetables, and separating juice from pulp.

I don't juice things every day, but there are times when I do a lot of juicing, like when it's tomato season and I want to make sauce.

A juicer does a great job of separating seeds and skin from pulp, which speeds up the sauce-making process a lot. I've used a standalone juicer for that sort of thing, but since I don't do a lot of juicing, it's nice to have an add-on rather that a big countertop appliance.

The major difference between this and a standalone juicer is that the juice and pulp don't eject from the food processor - the juice remains in the bowl of the processor, and the pulp stays inside the juicer attachment.

So, if you're going to make vast quantities of juice, you'll need to stop occasionally and empty the food processor bowl. But it holds a lot of juice, so it's not like you're stopping every few seconds.

And, depending on how fibrous or pulpy your fruits and vegetables are, you might also need to remove the pulp that accumulates. But again, it's not a big chore.

Juicer attachment.
If you already have a food processor, it wouldn’t make sense to buy this just for the juicing feature.

But if you’re shopping for a food processor, I'd highly recommend this one just because it's a really nice food processor, and then I'd suggest that you think about the juicing attachment as well. It's a heck of a lot cheaper to get the attachment, and it it's smaller and more lightweight than a juicer, so it's easier to store.

Bonus is that while some juicers are seriously noisy, this is only as loud as a typical food processor while it’s juicing.

Who's it for: Anyone who's shopping for a food processor

Pros: Juicer attachment is awesome. Really good food processor. Three bowls for different-sized batches.

Cons: Food processors are expensive. All of them are.

Wishes: I wish the parts fit into my dishwasher better. But that's my diswasher's fault

Source: I received this from the manufacturer for the purpose of a review.

Monday, December 15, 2014

How to use a French Fry Cutter

I've been playing around with a French fry cutter from Harold Import Company lately, and I've got a few tips that will make the job a lot easier for you.

First, make sure the cutter is assembled properly. There's a latch that holds the cutting part in place as well as a latch that holds the pusher in place. Those need to meet up properly or the pusher won't push the potato far enough through the blades.

Once it's assembled and latched, you're good to go. But don't be like me and forget to latch the cutting blade in place. Oopsie.

Second, square off your potatoes. This is the single most important thing do do for easier cutting. You don't need square off all the sides, but it's important that the bottom (the part that will be sliding along on the base of the cutter) and the two ends (first and last bits through the blade) are fairly well squared off.

You don't need to cut a lot off the potato, and you can certainly hand-cut those excesss pieces so you can cook them (they'd be oddly-shaped, even if you did cut them with the cutter), but if you don't have the potato squared off, it will tend to feed through the cutter at an angle, and then it becomes difficult to push the potato through the blades as it binds up.

However, if you potato is square, it slides through MUCH easier. It also helps if the potato is centered in the cutting blade and pusher, so the pusher is pushing evenly. If that makes sense. So somewhat larger potatoes tend to work better than small ones that are only contacting the bottom part of the pusher.

You might have seen the heavy-duty industrial fry cutters that are made from cast iron and are meant for hundreds of potatoes a day. That's not what we're talking about here. This cutter is a home-kitchen gadget. It works well, if you don't abuse it. But you're not going to be able to barrel through 50 pounds of potatoes a day.

Besides cutting potatoes, you should be able to cut other vegetables of a similar density (apples, maybe? Although I'm not sure why you want apple sticks).

I've read that even the more affordable industrial cutters aren't meant for cutting sweet potatoes because they're too hard, but I did cut purple sweet potatoes with this unit. Maybe purple sweet potatoes aren't as hard as red ones. But maybe it's better not to test fate. If you break yours from cutting something you shouldn't, don't blame me.

You can see some other fries I cut in this post.

I wasn't supposed to do this. But I did.
The cutter comes with two different blades and two different pushers for different-sized fry cuts.

Who's it for: People who don't want to bother hand-cutting fries.

Pros: Easy to come apart and clean. Not crazy expensive. Two different cutters. Small enough so it doesn't take a lot of storage space. Lightweight. Has a suction base to hold it to the counter.

Cons: This isn't as sturdy as the ones you see in restaurants, so you can't abuse it too much.

Wishes: I wish it was just a little bit longer, so it could accommodate bigger potatoes. Sometimes I encounter giant ones.

Source: I received this from the manufacturer for the purpose of a review.

Sunday, December 14, 2014

Gift Guide: Edibles (AND a Giveaway!)

Ho Ho Ho ... and a stocking full of ... food?

The great thing about being a food blogger is that people sometimes send me food to try. A lot of the time, it's snacks. Sometimes it's sauces or condiments. Sometimes spices. But the great thing is that quite often these are things that I might not have bought on my own. Sometimes because they're simply not available in my local store. Or the products are too new to be on store shelves.

These are great for gift baskets, grab bags, and stocking stuffers. Or for you, too. There's nothing wrong with giving yourself a little treat for the holidays

Here are some of my favorites.


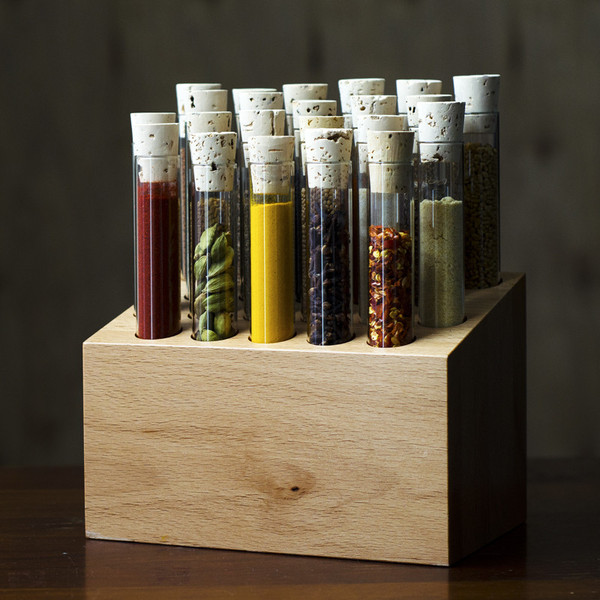
For your avid geeky cooking friends, the Spiceologist Block has spices in test tubes in a wooden rack for easy access and display. You can order a themed set, or choose your own spices. If you don't want buy a whole block of spices, you can pick and choose individual spices or rubs.


The perfect gift for folks who love cheese and crackers with extras. The spreads can also be used for cooking, like this recipe for figgy chicken. Check the bottom of this post for a giveaway!


Here's an easy way to spice up meats and vegetables. A great stocking stuffer, or tuck a few into a gift basket. I wrote about them here.


Perfect for snacking. Tuck a little bag into a stocking, or a larger package into a gift basket. Or fill a whole basket with shortbreads for you cookie-fiend friends.


Chocolate hazelnut spread makes a lovely gift for your nutty chocolate lover friends. I used it to make ice cream in this recipe.


Bacon spread in a jar. What more can you ask for? I used it to make corn chowder, but it's also pretty darned good spread on a sandwich, mixed into salad dressing, stirred into pasta or eggs, or used pretty much everywhere bacon is appropriate.

Nestle Delightfulls


Flavor-filled chocolate chips. A great stocking stuffer for your friends who bake, but they're also a great snack for your friends who'd eat them as a snack. Four flavors, and they're available at the grocery store, which is a great for last-minute space-filling in stockings or baskets.

Or, buy them for yourself and bake something. I made chocolate mint bars.


Flavored olive oils are fun, or you can get your friends a really unique gift by renting an olive oil tree, and your friends will get all the oil from the tree's next harvest. I have a giveaway for this oil going on right here.


For adults only - three whiskeys with pie-themed flavors - cherry, apple, and pecan. The pecan is my favorite, but the others are pretty darned good, too. I'll be writing more about these later.

Wild Hibiscus Flower Company hibiscus products and 
Honey Ridge Farms whipped honey


This is just a small sampling of what you can find from these two companies, so go check them out. In the photo, we have flavored pyramid salt, tea, hibiscus in syrup and a really interesting flavoring in that blue bottle. You'll be hearing more about these later.

The honey in the photos is a whipped blackberry honey cream, but they have plenty of other flavors.


For adults only - a new drink from Smirnoff with a sweet-sour flavor. Perfect over ice. I wrote about it here.


These little bottles of oils and vinegars are the perfect samplers. Great for new cooks who aren't sure what they like, or open the boxes and toss a bottle into everyone's stocking as a little extra something. Or have them on hand for the holiday table to drizzle or dip different flavors.


Umami is said to be the fifth thing we can taste, right after sweet, salty, sour, and bitter. Your cooking friends will love the pastes that they can add to whatever they're cooking, while the jars hold seasoning you can add at the table.

Giveaway is OVER.

Friday, December 12, 2014

Nudo Olive Oil #Giveaway!


Olive oil is probably my most-used food item. I use it for cooking almost everything AND I often use it in baking. So when the fine folks at Nudo asked me if I wanted to host an olive oil giveaway here, I didn't hesitate for even a second.

Quite a few years back, I heard about their adopt-an-olive-tree program where you buy the oil from one tree in one of their groves. You pay ahead of time and get the oil after the harvest. I almost bought a tree ... almost ... but at the time, it was a little more money than I wanted to spend.

Instead, I bought some of their olive oils and other products. So even before this giveaway, I was familiar with them.

But, I didn't know the history of the company. To be honest, I don't feel like paraphrasing this because I'm feeling lazy and this is pretty well-written. So, this is what they have to say about themselves. Ha!

Introducing Nudo (http://www.nudoadopt.com/)! The brand began Back in 2005 after Jason Gibb bought and restored an abandoned 21 acre olive grove in Italy’s Le Marche. He and his partner gave up successful careers as TV producers to build a business in the Italian countryside, following a hunch that they’d enjoy being olive farmers. From their initial research it was clear that olive oil was a very crowded market, with a plethora of indistinguishable brands, low margins and consumer ignorance (some 20 years behind wines). Undaunted, they set off for to live in Italy, with little more than their one year old daughter, a pair of secateurs and an Italian dictionary.

They soon started their olive tree adoption program, which allows people all over the world to adopt an Italian olive tree and receive its olive oil. The program is a collaboration between artisanal olive oil producers in Le Marche, Liguria and Sicily with Nudo. Each olive farmer keeps responsibility for the care of their grove, and all the olive oil goes into the Nudo Italia adoption program. In giving financial security to the olive farmers, the program makes viable the traditional farming methods which, quite simply, produce the world’s best olive oil.

There are now adoptive parents all over the world, from Hollywood A-listers to ex-presidents. It is the perfect gift for the person who has everything. Today Jason works alongside the new owner, ex-theatre producer Katharine Doré OBE, who along with her 21 year old son Toby is restoring their groves in Liguria. Toby has autism so Katharine has had to carefully plan his whole life. But in the end, choosing a ‘career’ for him was a surprisingly easy decision thanks to his love of olives and everything to do with olive oil.

I got a sample pack (three oils) to try - lemon, garlic, and basil - all three flavors that I use very very very very often. Hmmm. That's one more very than oil, but I guess that's okay. I love the basil oil on pasta or drizzled onto tomato soup; the lemon on fish, chicken and just a tiny bit on salads; and the garlic on just about everything.

Want garlic bread? Just brush the garlic oil on the bread before grilling or baking. Try a combo of basil and garlic on chicken. Try a garlic and lemon on broccoli. Try lemon and basil on fish. Just keep trying them.

While I like these best as a finishing oil or for cold applications (like salad) in theory you could use them for gentle cooking. Like basil in your scrambled eggs, then mix in some tomatoes.

ONE lucky winner is going to get the same sample pack I got (depending on availability - if they improbably run out of something, they could ship a replacement.)


This post is sponsored by NUDO, who supplied the oils for me and for you.

Thursday, December 11, 2014

Wednesday, December 10, 2014

Perfect Bacon Bowl

There's something about late-night television commercials ... particularly the ones for the As Seen on TV products.

They look so ... enticing. I even want the cat-thing ... even though I don't have a cat.

So, there's the Perfect Bacon Bowl. Late at night it sounds like a good idea. In broad daylight, I wonder why I need bowls made of bacon, anyway. But I think again. Why don't I need bowls made from bacon?

The bacon bowl maker is made from some sort of alien plastic stuff. Okay, not alien. That I know of.

But it's not metal, which is good because I wanted to make bacon bowls in my microwave. If I wanted to make a dozen bacon bowls, the oven would make sense. One or two, I'm not going to be heating up the oven.

All ready for filling.
Inexplicably, the instruction say you should grease the bowl. Bacon is greasy, obviously, but I greased the bowls anyway, then placed the bacon according to the instructions, and popped them into the microwave for 2 minutes and 30 seconds.

And ... voila! Bacon bowls. Well, sometimes it was done in 2 minutes 30 seconds. But depending on the bacon, it could be a little longer. So you just need to check the doneness of the bacon (and maybe get rid of the grease!) and cook for a little longer, 30 seconds at a time.

When I went to remove the bacon from the bowls after the bacon was cool, there was just a little it of sticking until the bacon just sort of popped off the bowl. So, yeah, I'd suggest following the instructions. A little bit of oil makes sense.

When I first heard about these, I thought, gee, why not use use an upturned muffin pan to make bowls in the oven? But the joy of these things is that you don't have to use the oven. You can, if you want to. But like I said, the microwave makes more sense for just one or two bowls.

And then you do this. Scrambled eggs in a bacon bowl.
And ... the moat around the bowls did a pretty good job of containing the bacon grease. There was a little splattering in the microwave, as you'd expect any time you cook bacon in there. But it was no worse than any other microwave-bacon-cooking adventure.

If you want to, you can make the bowls ahead of time and refrigerate. If you want them warm, just microwave for 30 seconds or so, to take the chill off. If you cook them longer, they tend to sag a bit, but it's not terrible.

These could be considered one-trick ponies if you only want to use them for bacon, but there's no reason you couldn't turn them upside-down and use them to bake or microwave other things. Or make cookie bowls or bread bowls. Or ... well, pretty much anything else you want to use them for.

I have a weakness for shaped bakeware, so I'll probably find a lot of uses for these. Even some that don't include bacon.

Who's it for: Bacon lovers.

Pros: BACON bowls. Works in the microwave.

Cons: Normally, I would say price, but these are getting a lot less expensive.

Wishes: Mini bacon bowls would be kind of neat for one-bite appetizers, although wrapping the bacon around small ones might not be so fun.

Source: I received these from the company's PR firm for the purpose of a review.

Monday, December 8, 2014

EVO Oil Sprayer

I like the idea of a sprayer for oil. Sometimes I want a couple tablespoons or a quarter-cup of oil, but sometimes I need just a small amount - to spritz a bowl for rising dough or to add a small amount to a pan. Or maybe I want to evenly coat a large sheet pan loaded with vegetables waiting to be roasted.

I've tried other devices, but they all had annoying flaws. So far, the Evo sprayer is working well.

It doesn't require pumping to pressurize, it sprays like the water-spray bottles you'd use to mist your plants. But the holes are big enough for efficiently spraying oil. It's not a mist, but rather a spritz.

Which is perfectly fine with me. If I need less oil, I can spritz, then wipe with a paper towel or use a brush to spread the oil around.

You can change the nozzle to spray a stream or a wider spray, and of course the total amount you spray depends on how far you pull the trigger.

One problem with spray bottles is that the nozzles can get clogged, but if you use oil all the time, clogging is less likely. I use oil pretty much every day I cook, so that's not a problem. If you put a sprayer in a cabinet and leave it there for a week at a time, you have a good chance the nozzle will need to be cleaned more often.

It also depends on the oil you use. I find that canola tends to get gummy faster than other types of oils, so it's the most likely one to clog the spray nozzle.

One neat thing about the sprayer is that it comes with a set of rubber bands to label the bottle based on the type of oil. There are three bands, but the wording is on both sides, so that's five oils and one for balsamic vinegar.

If you've only got one sprayer, you probably don't need to label it. And, let's face it, you could tell which one is balsamic vinegar from looking at it. But if you like the sprayer and decide you want one of olive oil, one for peanut oil, and one for vegetable oil, having an easy way to label them makes sense.

Another nice thing is that it includes a funnel that's made to fit the bottle, so you can fill and refill the bottle without spilling.

The bottle part of the sprayer is dishwasher safe, but the sprayer part is not. If you're refilling with the same oil each time, I don't think you'll need to wash very often, though, and if you do, it makes sense to simply fill the bottle with soapy water, spray to clean the sprayer, then rinse and fill with clean water and spray that to get the soap residue out of the sprayer.

I still plan on buying cans of baking spray with flour to spray baking pans, but for other purposes, I can see that this is going to become very handy.

I've only been using this for a few weeks, so I can't tell you how I'm going to feel about it a year from now. But so far it's doing exactly what I need it to do.

Who's it for: People looking for an easy way to easily dispense oil.

Pros: No need for disposable aerosol cans. include a funnel for filling. Sprays a stream or a wide spray.

Cons: The spray is not as fine as a mist, if that matters.

Wishes: It would be neat if they came in different colors for an easier way to tell the difference between different oils, if you want several of these. Or just for decorative purposes. Some people like things in their kitchens to match.

Source: I received this from the manufacturer for the purpose of a review. For more info on the product, check out their website.

Friday, December 5, 2014

Stephens Hot Cocoa #Giveaway

Seriously, how can you say no to hot cocoa?


Well, maybe you can, but I can't. The nice folks at Stephen's Gourmet sent me three cans to try and it was about two seconds after I opened the box when I cracked open the first can - the Orange Creme. I have no idea why I decided to try that one first, since I generally don't like chocolate and fruit.

Much to my surprise, I liked it. Go figure.

Next I tried the Italian Amaratto, but I didn't drink it on its own. I made a less-strong cup of coffee in the morning and boosted the flavor with the chocolate. Another winner. But, like I said, how can you go wrong with hot cocoa?

After I got these, I realized that I used to buy this brand at a local store, but then it disappeared, and I hadn't looked for it for a while. So I was glad to see that it's still available.

By the way, this is the type of cocoa that you mix with hot water rather than milk, which is kind of handy, since it always seems like I want a mug of cocoa when the milk is running low.

So there we go. Hot cocoa. Three cans for me and three cans for one of you.


Stephen's Gourmet provided cocoa for me to sample and will be sending cocoa to the giveaway winner. Winner gets to choose flavors from among: candy cane, pumpkin spice, orange crème, cookies ‘n crème and amaretto.

Thursday, December 4, 2014

Wednesday, December 3, 2014

Crisp Herb Mincer

One of the best things about having a review blog is that I get to play around with gadgets that I probably would never buy. Not that they're expensive. Often the opposite. Most likely it's that I already have a tool that does the same job adequately. so I wouldn't go looking for a different tool that does the same thing.


But if someone sends me a bunch of tools, I'm more than happy to see how well they work. It's fun, and the best part is when I find a tool that works better than I expect it to.

Not too long ago the folks at Crisp sent me a selection of their tools.

I was fascinated by the Crisp herb mincer. This is one of those tools where a great number of people will say, "I can do the same thing with a knife." Yes, you can do the same thing with a knife, but maybe you don't want to.


Not everyone's got the knife skills of a chef, and not everyone wants to end up with fingertips scented with herbs and spices.

And not everyone wants their kids handling a sharp knife. While the business end of the herb mincer is plenty sharp, kids could be shown how to keep their hands on top of the mincer while cutting which would be at least a little safer than having them with a knife in one hand while guiding the herbs with the other hand.

Besides mincing herbs, this also has two notches for stripping leaves off of stemmed herbs like rosemary or thyme.

It worked just fine for herbs, as expected. But then I started wondering what else I could chop. I tried some sundried tomatoes straight from a jar, and I was pleasantly surprised at how well it worked. And it was fast. Probably faster than using a knife, considering that I would have stopped to clean the knife blade a few times.

While I haven't tried it yet, the spacing of the blades would make it handy for cutting thin ribbons of pasta. I don't see any reason why it wouldn't work.

For cleaning, the herb mincer comes apart, and you can just put the parts in the dishwasher.


For storage, there's a cover that goes over the blades. It took a few times of taking it apart and re-assembling before I figured out exactly where to grab and pinch to make it easier.

I wouldn't call this an essential gadget, but I found that it was a lot more useful than I expected it to be. I have to be completely honest and say that it was fun to use, zooming back and forth across the herbs and watching the multiple blades mulch them into small pieces.

Unlike similar gadgets that do their cutting in an enclosed space, this does all the cutting on the cutting board, so you're not limited to tiny amounts of product to be chopped, which makes a lot more sense to me.

I'm sure a lot of people will totally love it.

Who's it for: Anyone can use it, but I suspect it will be more attractive for people who don't have great knife skills.

Pros: Easy to clean, works well.

Cons: If you're a knife ninja, you probably don't need this.

Wishes: It was a little fiddly to take apart and put back together. Now that I've figured it out, it's not that bad, but I have to wonder if it couldn't be made a little easier. Maybe not.

Source: I received this (and several other Crisp products) from the manufacturer for the purpose of a review.

Monday, December 1, 2014

Blueberry and Cream Cheese Buns from Make Ahead Bread

To help send my book into the world in grand style, I enlisted the help of the bloggers (past and present) from Virtual Potluck, who all said yes and baked items from my new cookbook.

And there's a GIGANTIC giveaway, as well.

You'll find  the Virtual Potluck posts here:

Theresa from Foodhunters Guide to Cuisine
Rachel from Rachel Cooks
Marnely from Cooking with Books
Jay from Bite and Booze
Shelby from Diabetic Foodie
Heather from Farmgirl Gourmet
Milisa from Miss in the Kitchen
Vanessa from Groovy Foody
Matt from Thyme in Our Kitchen
Tara from Foodie
Susan from 30a Eats
Donna (that's me) from Cookistry

But I figured you might like to see what the cookbook looks like (I know a lot of people love browsing inside a book before they buy), so I've got a recipe pulled straight from the book for you to enjoy.


My book, Make Ahead Bread, is available for sale on Amazon. If you'd like an autographed copy, you can order one from Barbed Wire Books.

For the giveaway, we'd like to thank our sponsors who generously offered some fantastic prizes:
There will be a total of 12 winners, with three bigger prizes and nine more really great prizes. And yes, all winners get a copy of my book. You'll find even more details about the prizes here.


In addition to supplying items for the giveaway, a special thanks to Taunton Press, Silverstone, Microplane and WÜSTHOF for supplying products for all the bloggers to work with.

Giveaway is OVER!

Do you want to know more about the sponsors? You can find them on their websites and social media, here:

Taunton on Twitter and Facebook.
Magimix on Twitter and Facebook.
WÜSTHOF on Twitter and Facebook.
SilverStone would like you to follow Pots and Pans on Twitter and Facebook.
Duralex on Twitter and Facebook.
GIR on Twitter and Facebook.
Harold Import Company on Twitter and Facebook.
Microplane on Twitter and Facebook.
King Arthur Flour on Twitter and Facebook.
Walker's Shortbread on Facebook.

This event is sponsored by multiple companies, all listed above. I want to sincerely thank them for their amazing generosity.