Friday, May 29, 2015

Emile Henry Bread Baker

You might have noticed that I have a lot of bread recipes over on Cookistry. And I wrote a bread-baking cookbook. I'm always experimenting with recipes, and with equipment.

The Emile Henry Loaf Baker is a new toy for me. It's made from glazed ceramic, and it has a ceramic top, as well. There are two holes on the top of the pan and two holes on the bottom, for a little ventilation.

If you've baked a lot of bread, you've probably noticed that it makes a difference what you bake the bread on - or in. Different materials have different heating properties - some heat faster, others heat slower. Some are better at transferring heat. And there are other differences.

What that means is that bread baked on a cookie sheet will react differently than one baked on a baking stone.

So, the Loaf Baker offers a much different baking experience than a standard metal baking pan. Not only is it a completely different material, but it also has a cover, which means the bread is baked in a much moister environment than in an open oven.

That moist environment results in a crisp crust - it's why some bread recipes suggest that you spritz water into the oven or have a pan of water in the bottom of the oven. The idea is to create a steamy environment for the baking bread.

But with an enclosed pan, you don't need to create steam - the bread itself gives off moisture, and that moisture gets trapped inside the pan. So you have the advantage of steam with less fuss.

I hesitate to say that one pan or one material is better than another. It depends a little bit on what your desired result is.

But I'm all about choices. I love having different pans to use, and the Emile Henry Loaf Baker is definitely worth adding to the baking arsenal. It's different from other pans that I own, and ... it's not just utilitarian. It's pretty. It would look good displayed on a shelf when not in use.

I think the lid is a major reason why this pan is appealing, but you can also use the pan without the lid, just like a regular baking pan.

I've used it for basic white bread and rye bread, but I'm sure you'll be seeing it on Cookistry for some more recipes I've been working on!


Who's it for: People who bake bread and want options besides basic metal bread pans.

Pros: Useful and attractive.

Cons: Since it's ceramic, it needs a little more care than a metal pan that you can drop without causing major damage.

Wishes: I wish I would have had this years ago.

Source: I received this from the manufacturer for the purpose of a review.

Thursday, May 28, 2015

Repast Ravioli Pin

Fonde ravioli pin from Repast Supply.
I was watching a show called Food Fortunes on television, and I saw a very intriguing ravioli pin being pitched to the investors. Most of them looked at it like they couldn't understand how it was used.

They liked the ravioli that was made for them, but they all turned down the opportunity to invest.

I might have yelled at my television.

After thinking about it, I realized why they didn't throw buckets of money at the idea. The problem, you see, is that the pins are hand-made in America. They're not molded from plastic overseas. They're functional, and they're beautiful.

They're also a tad expensive. More than investors thought people would spend.

Sure, the average person who never makes ravioli might think it's too much money. But then again, the average person who never makes ravioli wouldn't want a ravioli pin at any price.

I've made a lot of filled pastas, using gadgets and by hand. I'm always looking for a better way, so when I got a chance to test the pin, I was giddy with delight.

And also a little skeptical. The video made it look so easy. Too easy?


Would it really be this simple?

Turns out, yes, it was. I made a basic pasta dough, rolled out two thin sheets, slathered a filling on top of the first layer, put the second sheet on top, and rolled. The pin did all the work. The filling moved out of the way of the "edges" of the ravioli and neatly filled the pockets.

Then all I had to do was trim the edges and cut the ravioli apart.

A few tips: 

It's smart to make your sheets wider than the length of the pin, so you don't end up with a lot of half-ravs around the edges. My pin was the 17" model, but there's also a smaller model.

The amount of filling you slather does make a difference - if you have too much filling it will press out at the far end of the pasta. This isn't a horrible thing, though. You're working on a clean surface, so you can simply scoop it up and use it on the next round of pasta, if you're making more.

It's a good idea to have a thin sprinkling of flour under the first sheet of pasta, so that when you're done rolling and cutting, your ravioli will be easy to lift from the counter.

The dough should be fairly thin - you're eating a double layer of it, and it will plump a bit as it cooks.

If you're not sure your pasta sealed completely, you can press around the edges with your fingers, but I found that it did seal really well, even though I wasn't exerting tremendous pressure. Think about this: the moisture of that filling that you slathered all over the pasta actually helps it seal once the filling runs into the center of the ravioli.

If you've never made pasta before, it might take a little practice before you're totally confident and you love the results. But this pin makes it a lot easier.

Even better, there's something about making the pasta by hand and watching the magic as the little pillows fill up that's very pleasing. I was smiling the whole time I was working on recipes.

Speaking of recipes, I've got one finished that's one for a Southwestern Pierogi Ravioli on Cookistry right now, and I guarantee that you'll be seeing this pin making more appearances. It's just way too fun to use.

Who's it for: People who love beautiful, useful tools.

Pros: Makes ravioli easy.

Cons: It's a little expensive.

Wishes: I'd love to see the line expand for smaller ravioli as well as other shapes.

Source: I received this from the manufacturer for the purpose of a review.

Wednesday, May 20, 2015

Polar Ice - for totally clear cocktail ice

A few years ago, when I posted a cocktail recipe, I got a lot of comments about the ice. How did I get it so clear?

I had to confess that it I used plastic ice. It looked good and it didn't melt, which meant I had more time to take photos. But ... busted. I don't usually use fake stuff in food photos.

Not even garnishes.

Clear ice is apparently the holy grail for home cocktail makers. I read instructions that suggested using recently-boiled water, hot water, or distilled water. Other people said that none of those worked 100 percent of the time.

I tried a few different methods to get clear ice, but no matter what, I always got whitish ice cubes. Always.

So when the folks at Polar Ice Tray sent me a contraption for making clear ice - and not just clear ice, but large clear ice BALLS, I was all over it.

Could this be the gadget that works?

There are several parts to the ice molds - an insulated bottom piece (the blue thing on the bottom), a plastic holder for excess ice, and a two-piece silicone mold that makes the actual round balls. The top piece has designs that get embossed into the top of the ice balls - my set had a seal and a penguin. They also sell a set that has a polar bear and a walrus.

Photo courtesy of Polar Ice Tray

It takes quite a while for the ice to freeze, but then you have large ice balls that take a while to melt in your drink. If you want a dozen of them for a party, you might want several molds, or just start early and unmold and store them in the freezer in a plastic bag.

So ... drumroll, please ... they actually made totally clear ice. Not a single bit of white frosty stuff inside the balls. None.


By the way, clear ice was a little bit difficult for me to photograph. Because it's clear. It's nice for photographing drinks, though.

Here, the color of the cocktail reflected in the ice. That ice ball is totally clear, but it's picking up the color of the drink. In drinks that are less opaque, the ice doesn't detract from the clarity the way white ice does.


When the ice first comes out of the mold, you marvel at the clarity, then it gets a tiny white layer of frost. But that disappears as soon as you put the ice in a glass and pour some liquid over it. Or if you just let it sit for a short time so the frost melts.


Another interesting thing about this totally clear ice was that it didn't seem to crack as readily as normal ice cubes. If I poured warm or hot water on it, it sometimes cracked. But beverage temperature or cold liquids didn't seem to crack it. I haven't made millions of ice balls, but I've made quite a few cocktails using this ice - enough to note the lack of cracking.

That lack of cracking is very cool. Broken ice balls would not be cool at all.

For the fun of it, I tried embedding fruit inside the ice to see what that would look like. It was interesting, but not what I hoped for. My fruit - I used raspberries and blueberries - exuded color into the ice. So I ended up with a pink "cloud" surrounded by clear ice.


It still made an interesting presentation in a clear drink, but it wasn't as totally cool as having clear ice with something floating inside.

I think I might get better results by embedding something that isn't so ... wet, so it won't exude color into the freezing water. I'm going to try flowers, sprigs of herbs, mint leaves, or perhaps citrus zest and see what happens. I'm sure you'll see them in cocktails over on Cookistry.

Overall, I'm giddy happy with these. The ice balls are large so they melt really slowly, so a lingering drinker (like me) can enjoy a cocktail for a long time without it getting diluted. And they really truly produce totally clear ice cubes which is going to be great for photos for the blog.

Who's it for: People who covet clear cocktail ice.

Pros: Simple to fill. It's not a fussy thing.

Cons: Takes a while for the ice to freeze, so you do need to plan ahead.

Wishes: Can't think of anything ... they work as-is.

Source: I received this from the manufacturer for the purpose of a review.

Friday, May 15, 2015

Fresh Picked Muffin Cups

Why do cupcakes have to be round?

They don't, I tell ya. They don't.

These adorable little silicone baking cups from Fred 
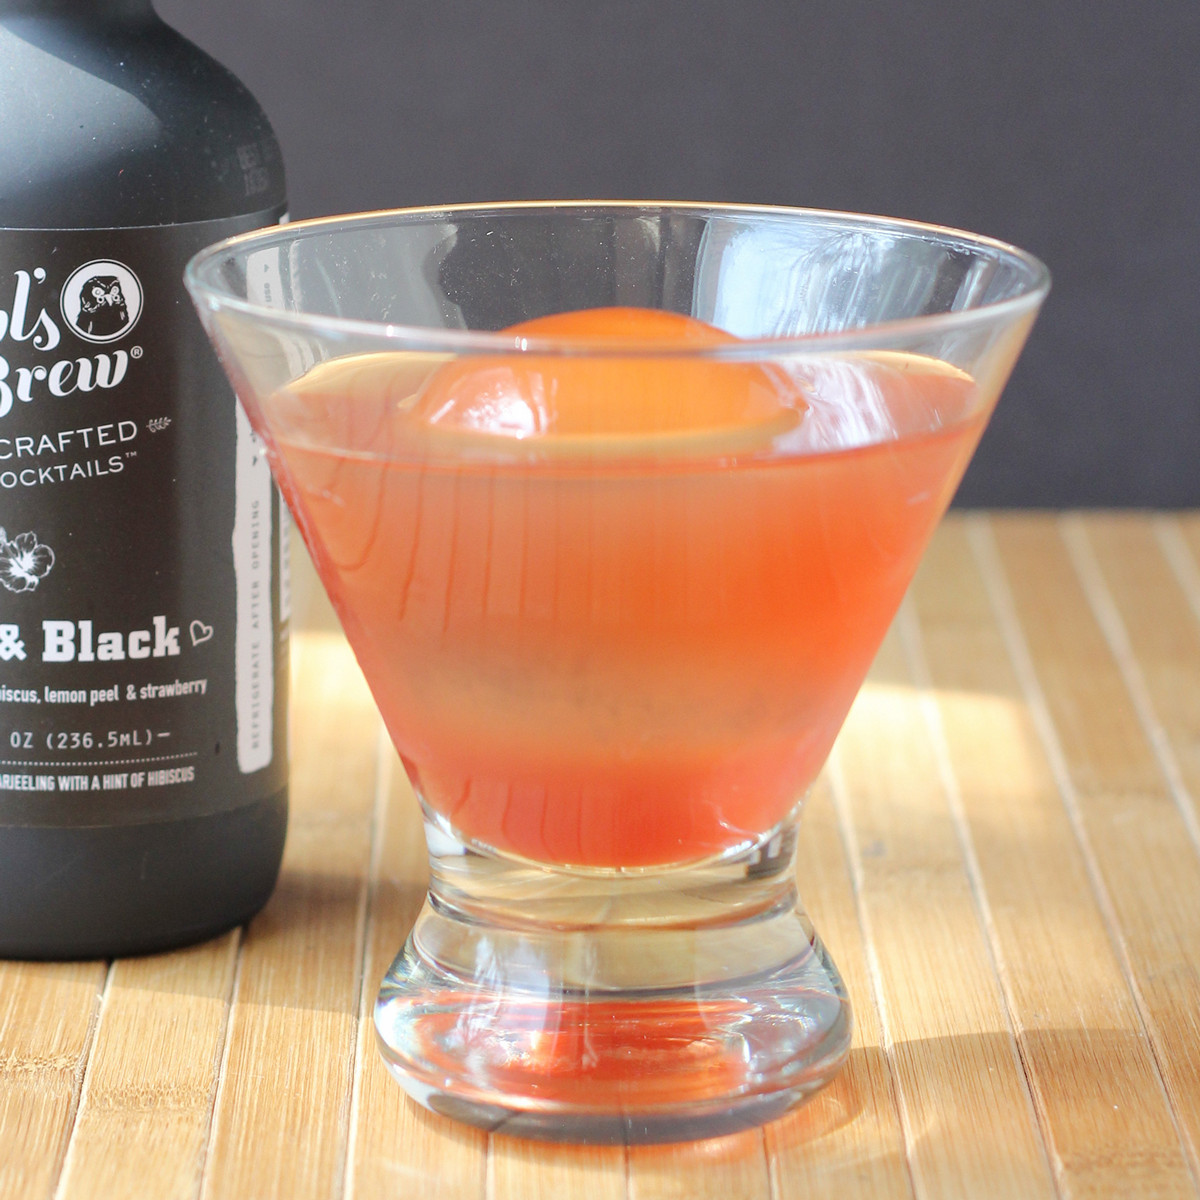
give you another option.

They're designed to look like the baskets that fresh berries come in, but they also resemble flowerpots that seedlings or small plants come in - so that gives you an extra decorating option.

They'd be perfect for fruit-filled muffins that show off the bits of fruit, or for cupcakes that you're going to decorate.

These are fairly sturdy, and they stood up well in the oven with no weird bulging when they baked, and since they're made from silicone, it was easy to remove the cupcakes I baked in them. Then, when they're empty, they're dishwasher safe - always a plus in my house.
The set comes with four cups, so if you're going to be baking a lot of muffins or cupcakes, you'll need several sets.

What I like using them for is for the extra cake batter I always have when I'm baking a standard cake recipe. Since I live at high altitude, I generally need to fill cake pans a little less to adjust for the extra rise that happens up here.

Not only does it solve the overflow problem, but it gives me a great way to sample the cake I'm making without slicing into it.

So far, I've been happy with these. They clean up easily, and I haven't had any staining, even when I baked a very dark chocolate cake.

Who's it for: People who like decorative desserts.

Pros: Easy to use; easy to clean. Can be used in oven or refrigerator or freezer.

Cons: They come in a 4-pack, so keep that in mind if you want to bake a dozen.

Wishes: I like this color a lot, but it would be nice to have other options.

Source: I received this from the manufacturer for the purpose of a review.

Monday, May 11, 2015

The Ribalizer

Ribs - check out the smoke ring!
Some years I'm more excited about getting outside and grilling than others. This year, I'm itching to fire up the grill ... and the weather hasn't been cooperating. I've managed to do some outdoor cooking, but not nearly as much as I want to.

And of course, the gadgets I'm reviewing are more about summer cooking than about baking.

Today's gadget is a thing called The Ribalizer.

You might guess that it's designed for cooking ribs. Yup. When you buy it, you get four disposable aluminum pans, two very sturdy metal racks, and a pretty big pouch of rib rub (I transferred mine to a jar, and it was about a pint). Instructions and recipes are included, too.

Ribs on the grill with Ribalizer.
If you follow the rib-cooking instructions, you'll use two aluminum pans - one for the base and one for a cover - for each cooking session. They're disposable, but you can choose to wash them, if you prefer.

There's a bottom metal rack that keeps the ribs (or other food - more on that later) above the water that you'll be putting in the pan. And then there's another rack that keeps the ribs separated for cooking.

Instructions suggest rubbing the ribs well ahead of time and also taking time to soak wood chips for smoking. When you're ready, the ribs are arranged in the rack and you add water to the bottom of the pan.

Then, you set your grill up for smoking using whatever method is right for your grill.

Cooked ribs.
The first stage of cooking is with the pan uncovered so the ribs can absorb the smoke. In the second stage, you put the second pan on the Ribalizer as a cover and you continue cooking. I followed the high altitude cooking instructions and cooked the ribs with smoke for 1 hour and covered for 1 1/2 hours.

I've cooked ribs using pretty much every method there is, from par-boiling to no boiling. This is the first time I finished ribs with steam.

I have to say that I liked the result. I got a nice smoke ring, the ribs were tender enough but not mushy, but they still had a little chew. And the rib rub was nice, too.

But that wasn't enough testing. I saw that they mentioned that you can use the ribalizer without the rib separator to cook a roast, so I decided to cook a pork roast in the ribalizer. The weather wasn't conducive to outdoor cooking, so I used the ribalizer in the oven.

Pork roast in oven on rack.
I was more than happy with the pork roast, but the lightbulb moment was when I realized that this would be great for cooking any sort of food where you want a rack that's well above the bottom of the pan.

Most roasting racks are fairly low - maybe 1/4 inch or 1/2 inch at the most. If you want to pile vegetables under the roast or you want a lot of liquid underneath, you don't have to worry about the roast smashing the vegetables or drowning in the liquid.

The Ribalizer is pretty big, so if you've got a big turkey to roast, it's going to fit. The pans are steam tray pans that are 20.75 inches x 12.875 inches, and about 3 inches tall. The Ribalizer folks sell them, or you can buy them at places like Sam's Club or Costco, and maybe at some grocery stores as well.

The one downside to the ribalizer setup is that the aluminum pan just sort of snaps together with the racks, and they come apart just as easily, so you need to be really careful if you need to lift or move the pan.

And, seriously, you're using disposable pans, so there's always a risk of the pan bending. And if you're poking around with a fork, it's possible to stab a hole into the pan. My suggestion: if you need a more rigid, solid, sturdy pan, stack a few pans together.

Who's it for:  People who want a different way of cooking ribs.

Pros: Also great for roasts. Racks are dishwasher safe.

Cons: The aluminum pans can be flimsy. They're disposable, but also recyclable.

Wishes: I wish the racks actually fit in my dishwasher; but that's a dishwasher issue. My dishes barely fit.

Source: I received this from the manufacturer for the purpose of a review.

Friday, May 8, 2015

Grill Grates

Grill grates on my grill. They will never be this clean again.
The first time I fired up my grill this year, I looked at the grill grates and thought, gee, I'm going to need to replace those nasty grates pretty soon. The enamel coating had chipped off in spots, and they looked pretty terrible overall.

As I was researching replacement costs, I got an email from a company called GrillGrate that makes ... well, grates for grills. They said that their grates were better, and I thought, "How could they not be better? Mine are rusty."

The GrillGrate website has all sorts of information about the heating properties of these grates and why they're better for grilling, but I don't always believe the hype. I said yes because I figured they couldn't possibly be worse than my rusty grates, and this would save me the cost of replacement.

At worst, they'd perform the same as the grates that came with the grill, and that would be perfectly fine with me. And if they were better ... well, then that would be a huge bonus.

The grates come in a few different sizes and shapes for different types of grills, from rectangular gas grills to round charcoal grills, but they don't need to be super-precise if you want these to lay on top of your existing grates. (You can also get them to replace your grates, which does need to be more precise.) My gas grill setup was pretty standard, but if you've got a weird grill or you need something special, you can also get custom grates.

The grates come in sections that link up, which makes a lot of sense for packaging, shipping, and handling. And even for washing.

While you're supposed to let these season - like a cast iron pan - if you drip some goopy marinade on them, it's nice to be able to pick up small sections that will fit into the kitchen sink, so you can wash off the goop.

But never mind all that. In the end, it's all about performance. How about some grill marks?


Here's another shot where you can see grill marks on the burger in the foreground.


I've cooked different types of meat and even salmon patties on the grates, as well as vegetables. There are holes in the valleys of the grates, but you're not going to drop anything through the grates and into the fire, so that's a plus. But the holes do let smoke though, for flavor. BUT! Even if there's a flare-up under the grates, you're not going to burn the food.

Well, I suppose if you tried really hard you could start a fire ON the grates, but you'd have to work at that pretty hard to make that happen.

I have to say that I'm beyond thrilled with these. I've never gotten grill marks like these from any of the many grills I've owned, and it really does seem like these even out the heat, so food cooked more evenly. Food didn't stick, and I think the nonstick properties will be even better as the grates "season" from being used repeatedly.

Since there's no enamel coating, like my old grates, these should last a long time - I don't expect I'll be replacing them, ever. And, if I upgrade my grill, I can still use these.

I really can't see a downside to these grates, except of course that they're not standard equipment on grills.

For more information about why these work, how to order, videos, recipes, and more, check out the GrillGrate website.

Who's it for: People who have grills.

Pros: Check out the grill marks. 'Nuff said.

Cons: Hmmm. Hmmm. Can't think of anything.

Wishes: Wish I had found them sooner!

Source: I received this from the manufacturer for the purpose of a review.

Thursday, May 7, 2015

Little Secrets

Clockwise, from top:
plain milk chocolate, dark chocolate peanut butter, plain dark chocolate,
and dark chocolate raspberry
I love it when local food-related companies find me. The most recent one was Little Secrets, a candy company. They make candy-coated little chocolates that should look somewhat familiar to you.

But unlike products from ginormous companies, this candy company is focusing on things like using Fair Trade, non-GMO and natural products.

One item that a lot of people object to in food products is the use of food colorings. The candies are colored, but they use natural ingredients. Here's a quote from their website:

We use turmeric to make yellow, beet juice for red, spirulina for blue, pumpkin, carrot, and radish for orange, and red cabbage juice for purple. We realize that sounds like an intense drink at a juice bar, but we promise our candy doesn’t taste like a farmer’s market.

Yup, I've tasted all four flavors (dark chocolate, milk chocolate, dark chocolate raspberry, and dark chocolate peanut butter) and I didn't taste a farmer's market. Not vegetal at all. But it is nice chocolate.

I have to say that the peanut butter is my favorite, maybe because I like nuts with chocolate. But I wouldn't turn down any of them.

Another clue that these are produced by a small company is that they're not all the same size. The filled candies - peanut butter and raspberry - are significantly larger than the plain milk chocolate and dark chocolate. If you dump them in a bowl together, it makes it easier to see which are stuffed, and which are plain chocolate.

They're also not perfectly shaped, which I find appealing. I'm also totally amused by the mythical beings depicted on the bags. I love when a company has a sense of humor.

The candies come in larger bags, like the ones above, for sharing, and also smaller bags for not-sharing. Although the big ones are fine for hoarding, too.

Who's it for: Candy lovers who want to avoid dyes and ... stuff.

Pros: Yum. They're really good.

Cons: Yum. These could be dangerous to have around.

Wishes: An endless supply would be nice.

Source: I received this from the manufacturer for the purpose of a review.

Tuesday, May 5, 2015

Microplane Elite Box Grater

Photo courtesy of Microplane
As you might guess, I have a lot of graters in my kitchen. Some, I use more than others. The nutmeg grater only comes out when I need nutmeg grated, obviously.

Although I had a box grater that I used fairly often, I was happy to get a chance to upgrade to the Microplane Elite Box Grater
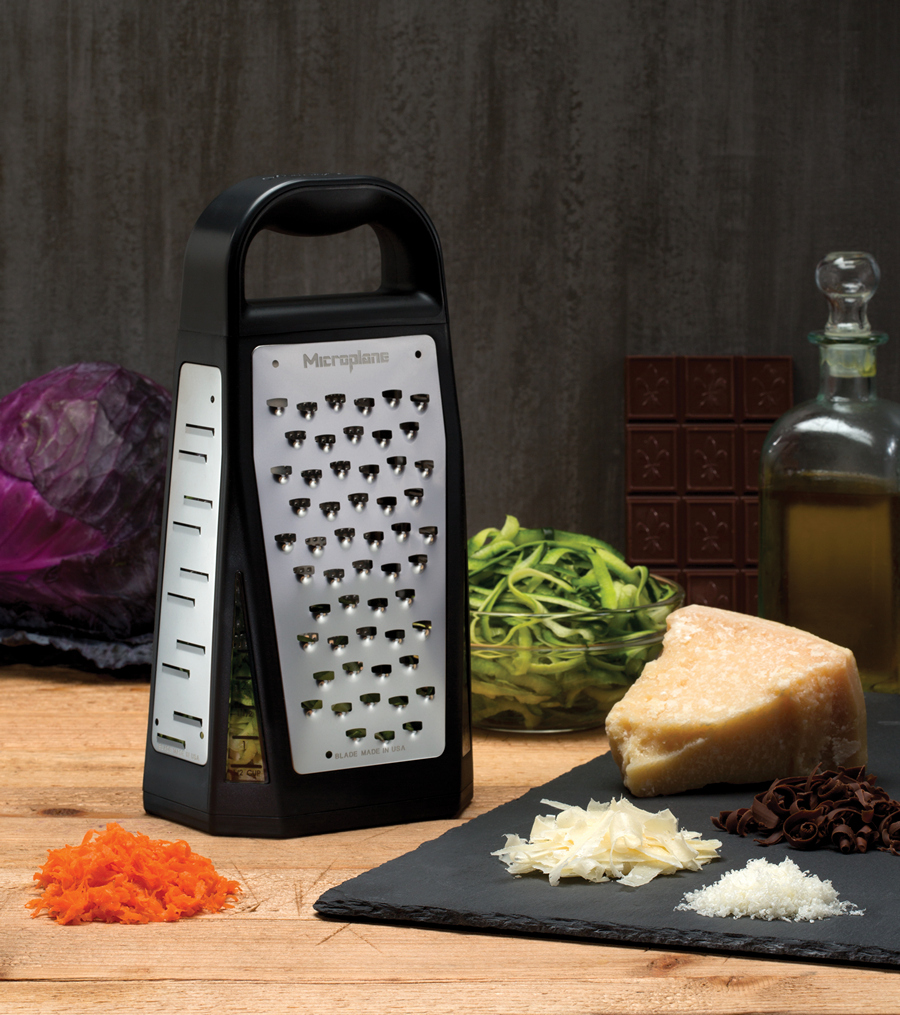
. It's a four-sided grater with five cutting surfaces.

What sorcery is that? you ask.

Well, one of the large sides has two different grating surfaces, which makes a whole lot of sense. Much of the time when I'm grating cheese, I'm only grating a small surface area of the cheese and only using a small swath on the grater. The harder the cheese and the finer the shreds I want, the smaller surface area I tend to grate.

So dividing one of the large grating surfaces into two types of grating (fine and coarse) makes perfect sense.

The ultra-coarse grating surface takes up the other large side of the grater, which also makes sense. When I'm coarsely grating softer cheeses, I tend to use a wider swath of the grater surface. The two smaller sides of the grater are the ribbon and shaver surfaces.

The grater also has a removable sliding bottom piece that holds the grated product inside the grater. Honestly, this might be my favorite feature. If I'm grating a small, unmeasured amount of something, I'm fine with using a paddle grater right over the plate, pot, or bowl. But when I'm grating a larger quantity or I'm grating ahead of time, I set my box grater on a cutting board or in a shallow bowl and I grate. Then I've got a bowl full of cheese or big pile of cheese taking up space on a cutting board.

Not with this grater. The cheese is contained inside the grater. A tiny bit of cheese does shave off outside the grater, but that's minimal. I recently grated 3 ounces (by weight) of Romano cheese, and I had maybe a teaspoon of shreds that fell outside the grater. That's what I call a tasting sample. Everything else was contained neatly inside the grater where it stayed until I needed it for the recipe.

The tricky part of this grater was removing the sliding bottom panel to get the cheese out. There's no actual trick to it - it simply slides out. But when the grater was brand-new, it was a little snug and a bit hard to slide out. With some use, I'm sure it'll loosen up a bit to make removal easier.

And of course, if you want to grate straight into a bowl or onto your cutting board, you can leave the bottom panel off.

Who's it for: Grate people, obviously.

Pros: Five cutting surfaces, dishwasher safe, holds cheese inside.

Cons: Bottom panel needs to slide in and out a few times before it un-snugs a bit.

Wishes: Probably silly, but I thought it might be cool if it could "stand on its head" so so speak. Balance on the handle. So I could add other recipe ingredients to the cheese in the grater that are going into the recipe at the same time. On the other hand, the handle is comfortable to hold onto as its designed, and I wouldn't want to sacrifice that.

Source: I received this from the manufacturer for the purpose of a review.

Monday, May 4, 2015

A Gift Basket for Mom - Or Dad. Or YOU. (Yes, there's a giveaway!)

I'm not a person who received a lot of gift baskets these days. But I've experienced the joys and let-downs of baskets before. They look marvelous until you unpack, and then you find that you're left with more packaging than product.

So when a company called GourmetGiftBaskets.com contacted me to see if I wanted to do a review and possible giveaway, I thought, "Aha! This is my chance to unmask the trickery of the gift basket industry!"

No, seriously, that's exactly what I thought. I might have even twirled an imaginary mustache and wiggled an eyebrow while thinking it.

And then THIS showed up.


Pretty, isn't it?

Here it is without the  plastic wrapping so you can see it a little clearer. 


Still looks impressive There's a lot of fruit and some stuff in boxes. Let's unpack it, shall we? It looks full, but we don't know how much packing material is under there, right?

Here's everything that was packed into the basket.


That's a freakish lot of stuff. There were two pears, two oranges, three red apples, and two green apples. The other perishable item was some Cabot cheddar cheese (the red item in front of the fruit). The container to the left of the fruit is a caramel dip for fruit, but I'm more likely to use it for ice cream. And there were crackers, candy, popcorn, cookies and other snacky things.

And here's the basket, without packing materials and with all the items piled into the basket.


I didn't do a great job of re-packing in an attractive way. but you can see how full it still is. Yes, there were packing materials, but not a huge amount. I mean, you don't want fresh fruit bouncing all around, and there was some padding in the bottom to keep everything in place and looking good.

I don't think I could have packed it all so neatly and securely with less padding.

And the basket itself has uses after it's empty. It would make a nice picnic basket or a display basket. It might be a little big for a bread basket unless you're serving a huge crowd, but you could store magazines in it, or towels and goodies in a guest bathroom. Or ... I'm sure there are other uses.

Want to see another one?

This is a wine basket with a bottle each of red and white wine.


This one was packed pretty full, too. Check it out!


The wines are real wines by real wineries that sell in stores - not some weird-branded mysterious swill. And then there are other wine-related noshes and nibbles, including a small wheel of cheese and a chub of sausage.

I have no idea what wine wafers are (the large item in the back), but that's part of the fun of a basket like this. You get to try things that you might not be familiar with.

Instead of a wicker basket, this one was a metal-mesh basket with a cloth liner and metal handles with wooden grips. The cool thing about sending an actual basket to someone (rather than a box of stuff) is that after all the edibles are gone, the recipient has the basket to keep and use.

Just like the first basket, this one had just enough packaging to keep things neat and tight and safe and nicely arranged - particularly important since glass wine bottles are breakable.

So I guess I was fooled, eh? These are legit gift baskets that aren't overstuffed with Styrofoam. I have to say that I was pleased that I was wrong.

Anther great thing about ordering from this company is that there are no surprises when you're choosing a basket. Each description lists of all the basket items, including the brand names and the weight (or volume) of each item. You'll always know exactly what will be in the basket. Exactly.

Since I was pleased with these baskets, I've got a GIVEAWAY for you. One lucky winner will get the basket of their choice priced at $69.99 or less. If you want to splurge on a bigger basket, you can use the credit and pay the difference.

But trust me, there are plenty of gift baskets to chose from for $69.99 or less. Check out the Mother's Day Baskets! And, if you're not into baskets, there are cheesecakes, popcorn tins, cakes, chocolate-covered berries, and a whole lot more.

The giveaway will run past Mother's Day, but there are Father's Day baskets as well, or choose something for an upcoming birthday, or a treat for yourself. Many, many choices.


I received gift baskets from this company for myself, and they are providing the product for the contest winner as well.

Saturday, May 2, 2015

Cookbook Giveaway

See the recipe HERE.


Melissa's sent me a copy of the Melissa's DYPs cookbook for my use; since I already had a copy, I'm giving one away and will ship to the winner. They also sent me a selection of produce.

Friday, May 1, 2015

Chateau La Paws Wine

Snickers the hunting dog spots her prey
As a food blogger, I get a lot of fun stuff sent to me. My husband reaps the benefits, because most of what I get is cooking-related, and he likes to eat.

But Snickers, although she does her job and warns me when FedEx or UPS trucks are approaching, seldom gets anything.

Snickers, if you don't already know, is the dog-in-residence. The four-footed family member.

Checking to see if anyone's watching.
Snickers came into our lives when things were pretty grim. My husband was seriously ill in the hospital, and while he was there, I made the hard decision to put our old dog down. It was the right decision for her, but left a hole in my heart.

Coming home from the hospital every night to an empty house was almost more than I could bear. The house seemed unbelievably huge and empty. I stopped by the local Humane Society on my way to the hospital one day, and browsed. I went back another day and took a dog for a walk.

"She's a little shy," they told me. "It might take some time for her to warm up to you. We took a walk, and then I sat on one of the benches, and she crawled up on my lap and cuddled.

Score!
I handed her back, went to the hospital, and couldn't stop thinking about that dog. So I told my husband I had an errand to run, and went back to the Humane Society and adopted our new dog. I had bowls and toys and a dog bed, all too big for her. But she didn't seem to mind.

I put one of my husband's unwashed shirts into her dog bed so she could get used to his presence. That first night when I went to bed, she crawled right into her new bed and we settled down for the night. Just about the time I was falling asleep, I felt a little thump on the bed as she jumped up and settled next to my feet.

So much for the "no dogs in the bed" rule, but it was very comforting to have her there.

I told my husband nothing about the old dog or the new one for a long time. He had plenty of other things to deal with - I didn't want him feeling sad about the loss of our longtime companion, and I wanted the introduction to the new dog to be a happy one. And, frankly, I worried just a little bit. Would she like him?

I needn't have worried. She snuggles up to him just as much as she snuggles up to me.

So today, a box arrived that was intended for both me and Snickers, much to her delight. For me, there were bottles of Chateau La Paws wine, and she got some treats and some tennis balls. Chateau La Paws supports no-kill shelters, and Snickers endorses Chateau La Paws. Or at least she endorses the snacks.

I haven't done much more than sample the wine, but I have to say that these would be great to bring to parties or potlucks or BYOB events. The dog photos on the bottles would be sure conversation starters.

While I don't make a lot of cocktails using wine (sangria is nice, though!) a wine spritzer is nice for summer. You can change it up a bit my adding fresh fruit or fruit juice, but it's just as lovely all on its own.

Wine Spritzer

1 1/2 ounces Chateau La Paws Chardonnay (you could also use the red wine, if you prefer)
2 ounces fruit juice (I used a cranberry/raspberry blend - citrus would be nice, as well)
Seltzer or sparkling water (lemon-lime soda would be fine, for a sweeter drink, or ginger ale for something with more zing)
Lemon, lime, or orange slice, for garnish

Fill a tall glass with ice, add the wine, add the juice, and fill the glass with seltzer or sparkling water.

Garnish with your favorite citrus (and you can add a squeeze to the drink, as well).

Serve and enjoy!

Really refreshing on a hot summer day!

I received these products from the winery at no cost to me. Snickers didn't pay for hers, either.

For more cocktails (including some of mine) check out thebar.com.